Introduction
Overview
This documentation is intended to provide guidance to administrators of the SSDI Catalogue. It assumes familiarity with the user guidance, particularly around the creation and validation of metadata.
The administrative functionality within the catalogue is accessed via the Admin console, on the top menu when you log in with an administrator profile. Additional functionality, such as downloading catalogue-wide reports, is available from the advanced search page and also the Editor board.
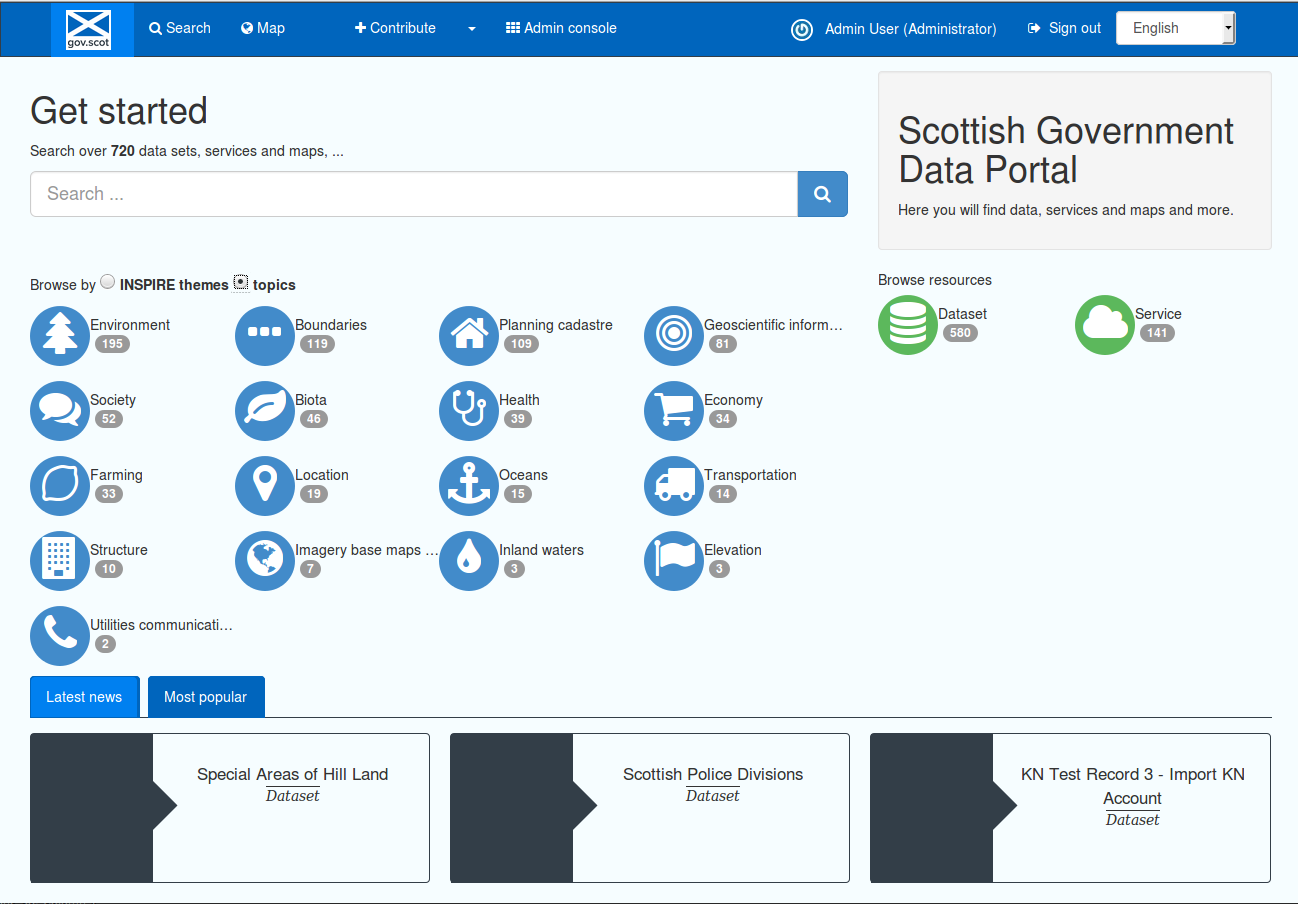
Figure 1.1.1: SSDI catalogue main page, showing admin console link
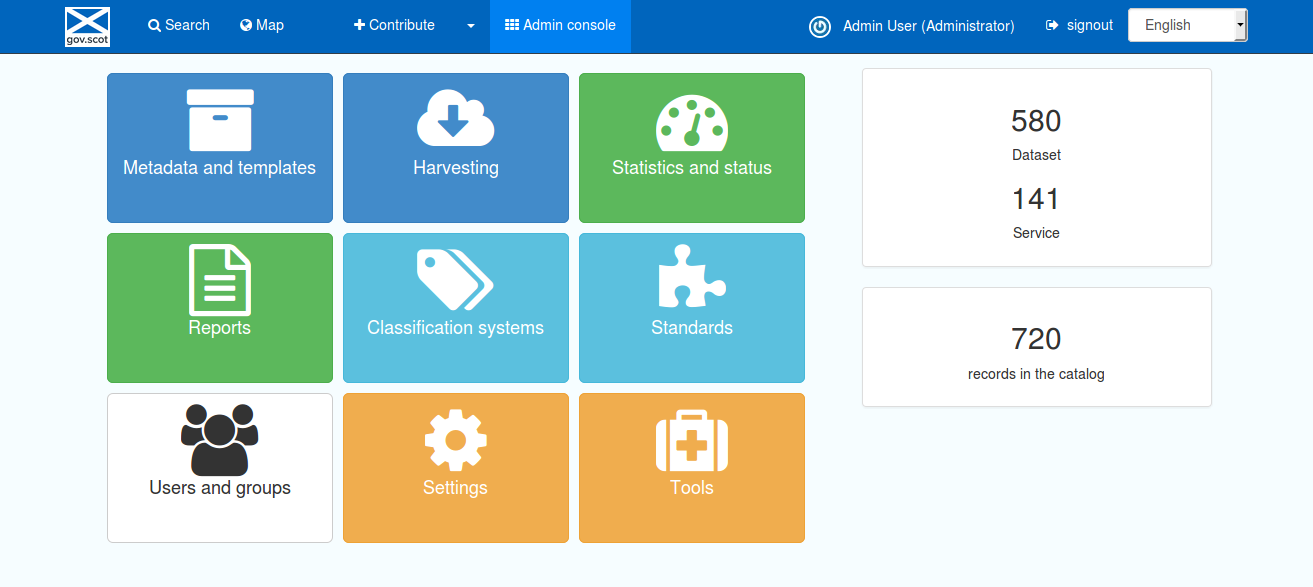
Figure 1.1.2: SSDI catalogue admin console, for a full administrator
The level of functionality available in the admin console is dependent on the privileges of the logged in user. The above image shows the admin console for a full Administrator. This page also provides a quick “at a glance” view of the number of records available.
Searches
Advanced Search
The Advanced Search capability in the catalogue is accessed by clicking the magnifying glass icon on the home page or by clicking on the  button on the top menu to navigate to the Search page.

Figure 2.1.1: Search icon on main catalogue page
Filtering options, or search facets, are available to the left of the search results, as a series of check boxes. The results can be sorted by Title, Relevancy, Rating and Popularity, and either lowest or highest scale first.
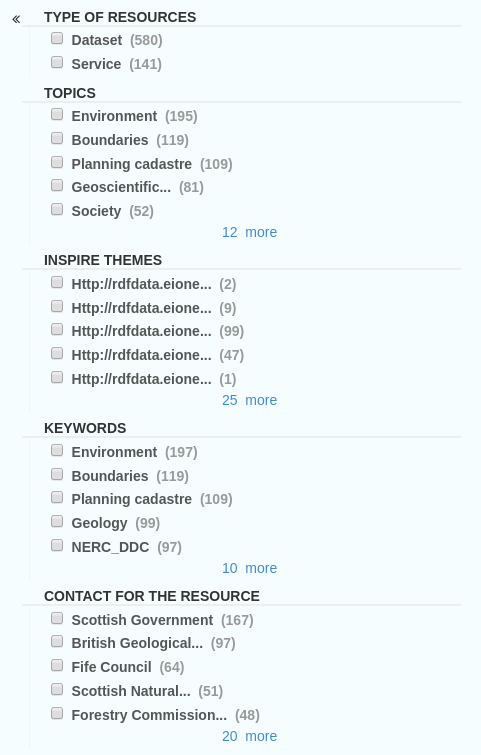
Figure 2.1.2: Search facets, or further filtering options on the search page
Other search options are available from the  icon to the right of the main search box. This expands to show Options, Languages and Advanced
options. Options allows users to search by Exact match, In title only, and Only my records. Languages allows users to limit the search based
on the metadata language of a record. Advanced allows users to limit the search based on the temporal coverage of a record.
icon to the right of the main search box. This expands to show Options, Languages and Advanced
options. Options allows users to search by Exact match, In title only, and Only my records. Languages allows users to limit the search based
on the metadata language of a record. Advanced allows users to limit the search based on the temporal coverage of a record.
Further search capabilities can be accessed by clicking the  button on the main toolbar. This opens the Editor board, where there are also options to create or import new metadata, and also view privileges for or edit existing records. This page shows different search filtering options or facets, including group, schema, validation status, workflow status and so on.
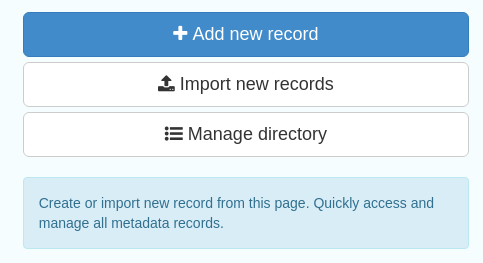
Figure 2.1.3: Options to Create or Import new data

Figure 2.1.4: Search facets available from Editor board
Advanced Workflow
The Editor board can be used to perform administrative functions on individual or batch metarecords. Tools for acting on individual records are represented by icons to the right of the metadata title. The validation status of a record is indicated by the colour of it’s icon:
Green- validated and passing checks
Red- validated but not passing checks
Grey- not yet validated
White- a template or other record that should not be validated
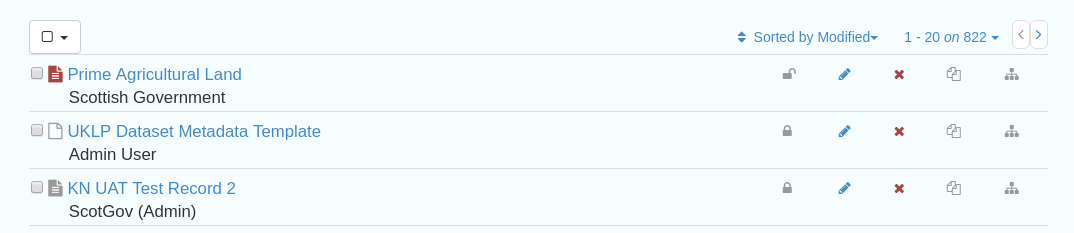
Figure 3.1.1: Administrative functions that act on individual records, accessed from the Editor board
In order from left to right these are:show_harvester_facets_button
Privileges- set privileges on which groups can access or edit this record
Edit- access the metadata editor for this record
Delete this record
Create a child record
Duplicate record
To act on multiple metadata records, use the select function and choose the appropriate function from the dropdown list:
Export (ZIP)- exports the records in MEF format
Export (PDF)- exports as a combined PDF- note this will disregard any templates
Export (CSV)- exports as a combined CSV- note this will disregard any templates
Selection Only
Update privilges- note that this will UPDATE privileges rather than APPEND to existing ones
Publish/Unpublish- add or remove the “publish” privilege from the “All” group
Transfer Ownership
Validate
Validate record links
Update licence
Delete
Index records
Create collection from selection as - create a series from the selected records
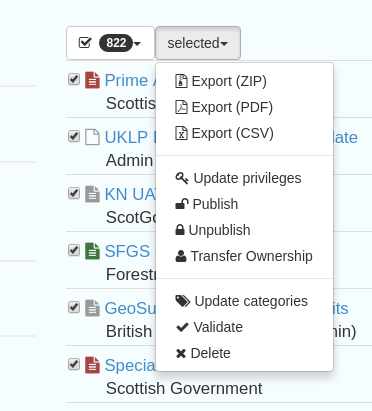
Figure 3.1.2: Administrative functions that act on multiple records- top options

Figure 3.1.3: Administrative functions that act on multiple records- bottom options
Manage Directory
Directories are snippets of information that can be pre-completed and inserted into metadata records. They are derived from subtemplates that are part of metadata standards. The available subtemplates are shown as tabs across the top of the Directory subsection- for Gemini 2.2 and 2.3 these are Organizations and contacts, Data Quality Reports (Completeness) and Data Quality Reports (Domain Consistency). The Manage Directory section can be accessed by clicking on the Contribute button in the header menu and then on Manage directory.
Selecting Organizations and contacts shows the metadata snippet for adding a Points of Contact subtemplate. To create a new record based on this template, click the “Duplicate” icon ( ) in the Actions dropdown.
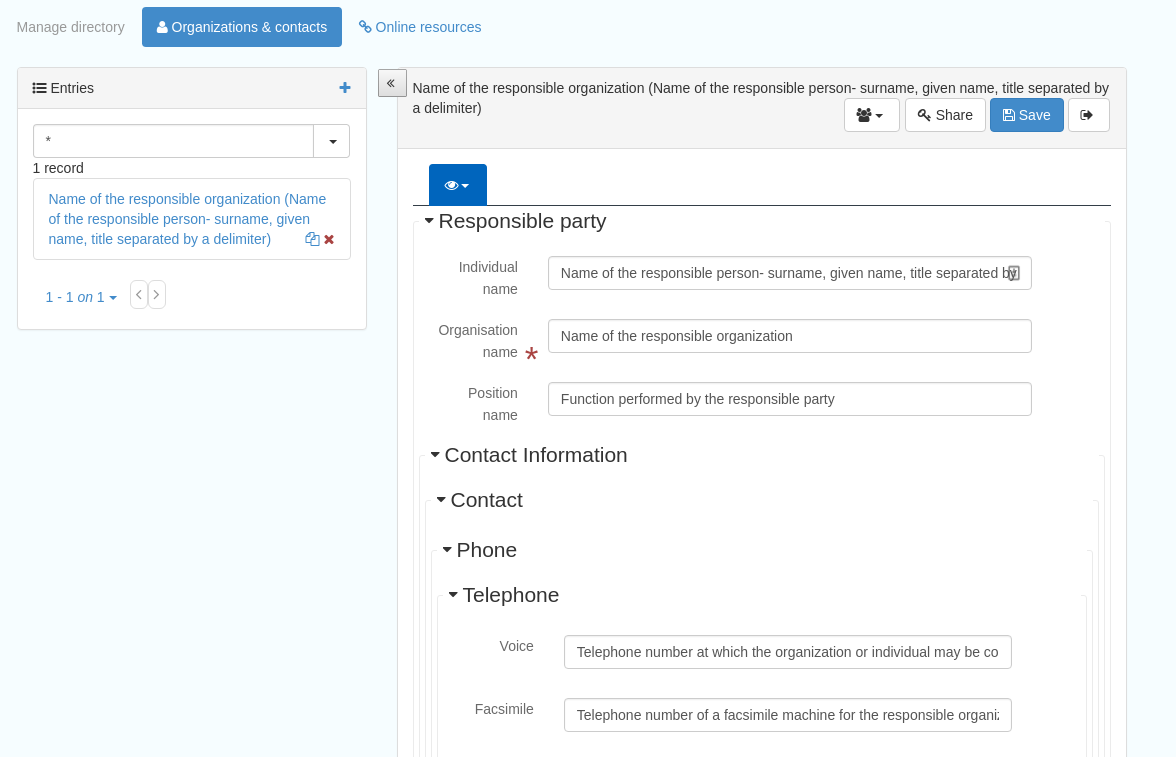
Figure 4.1.1: The Organizations and contacts interface
Along the top of the entry window are, from left to right:
Group (dropdown)- which group should have ownership of this subtemplate
Permissions- which groups should have visibility of this subtemplate
Validation status
Save
Save and close
It’s also possible to change the view that is used for completing this subtemplate, from default to xml view by clicking the “eye” symbol ( ).
).
Once saved, the contact will be available using the “search for a contact” dialogue when creating or editng a metadata record.

Figure 4.1.2: Adding a point of contact snippet when editing a record
The dropdown box next to the contact name allows the user to choose the element where this snippet should be inserted.
Batch editing
The Batch editing section can be accessed by clicking the button in the header menu and then on Batch editing.
This section can be used to make XSL transformations on multiple records at once, such as to update contact information in bulk, change internal URLs or update keywords. It is wise to request a database backup before performing a batch edit as there is no way to undo the transformation once it has been started.
This process has three steps to it, each represented by a different tab at the top of the Batch editing page:
Choose a set of records
Define edits
Apply changes
Choose a set of records
 Figure 5.1.1: Batch editing tool showing search results for “National Scenic”
As well as searching for a record by title (as in Figure 5.1.1), a user can also filter the records using the facets on the left-hand side of the screen.
The options available for filtering are:
Type of resources
Status
Validation status
Record groups
Published in that group
Standards
Harvested
Record types
Access
The Filter and Search term can be cleared by clicking on the  button at the right of the search bar.
 Figure 5.1.2: Search bar showing the available buttons
Once the desired records have been located and selected using the tick box next to their title, an option for the user to View selection only becomes available at the right of the search bar. Once the user is happy with the selection of records that are going to be changed, the next steps become available to be selected.
Define edits
Three distinct types of edits are available to the user, each represented by a radio button:
Search and replace
XPath editing
Form editing
Search and replace
The fields available are:
Value- the value to be replaced
Replacement- the new value
Regular expression flags- dropdown menu options include:
i: enables case insensitive matching
c: disables case insensitive matching
n: allows the period to match the newline character
m: enables multiline mode
 Figure 5.2.1: Batch editing tool showing the available Search and replace options
XPath editing
Note: XPath stands for XML Path Language. It uses a non-XML syntax to provide a flexible way of addressing (pointing to) different parts of an XML document. It can also be used to test addressed nodes within a document to determine whether they match a pattern or not. A good summary of its syntax can be found here: https://www.w3schools.com/xml/xpath_syntax.asp
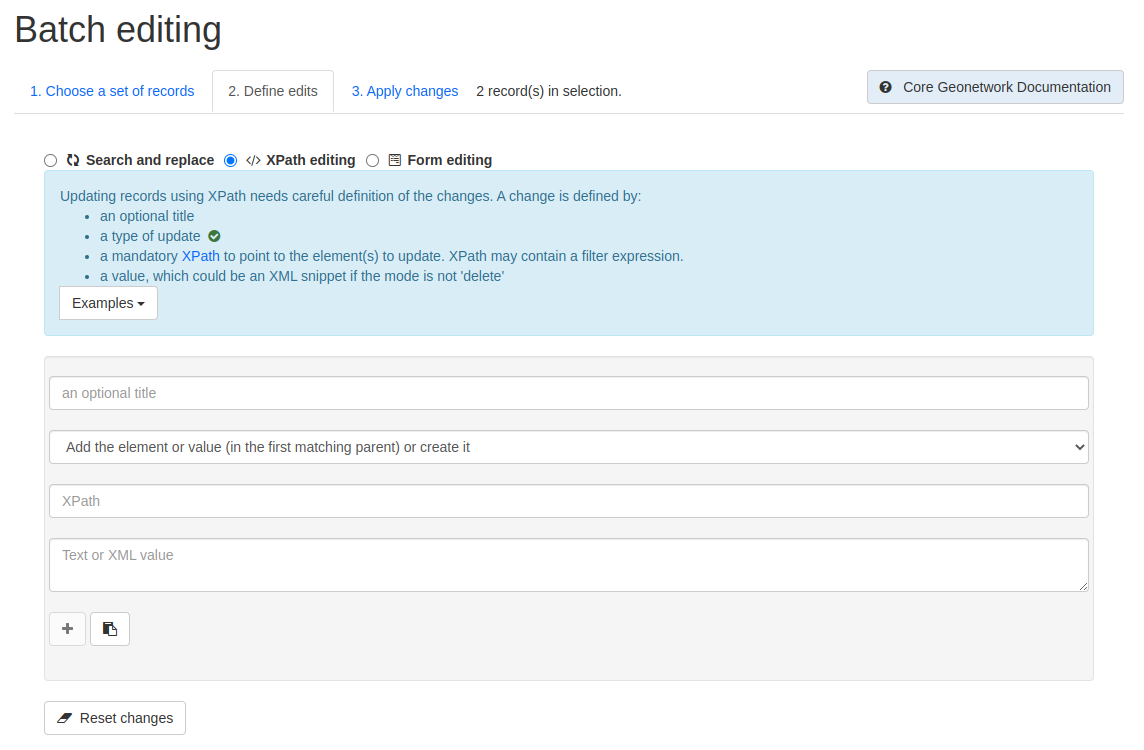 Figure 5.2.2: Batch editing tool showing the available XPath editing options
The fields available are:
Title (optional)
Replacement mode- dropdown menu options include:
Add the element or value (in the first matching parent) or create it
Replace the element or value (in the first matching parent)
Remove all matching elements
Xpath- the Xpath to the element or value to be replaced
Text or XML value- the new value or element
Once the fields have been filled in accordingly, the user needs to click the  button to confirm the change.
At this point the user has a few options:
Fill the top fields again and click the
button to add another batch edit to the same set of recordsClick the
 button to edit an existing batch edit
Click the
 button to remove an existing batch edit
Click the
 button to copy the contents of an existing batch edit
Form editing
Note: Depending on the type of records selected, the list of fields you can update may change. When editing a mandatory field like the title, the field is updated. When editing a field which can contain multiple values, a new value is added.
Each of the sections can be expanded to show the available fields to edit and a new value can be inserted in the relevant fields.
There is also the option to reset all the changes, by clicking on the  button at the bottom of the page.
 Figure 5.2.3: Batch editing tool showing an example of an expanded section and the Reset changes button
Apply changes
Once the user is happy with the set of records that will be changed and the modifications that will be applied, they can navigate to the last step - applying the changes.
This tab shows a summary of the changes that will be applied, as well as a list of records that will be changed and an option to “Update the modification date in the metadata document“.
Once the  button has been clicked the changes will be applied and can’t be reverted!
A report will be displayed showing the number of records processed and any errors or issues.
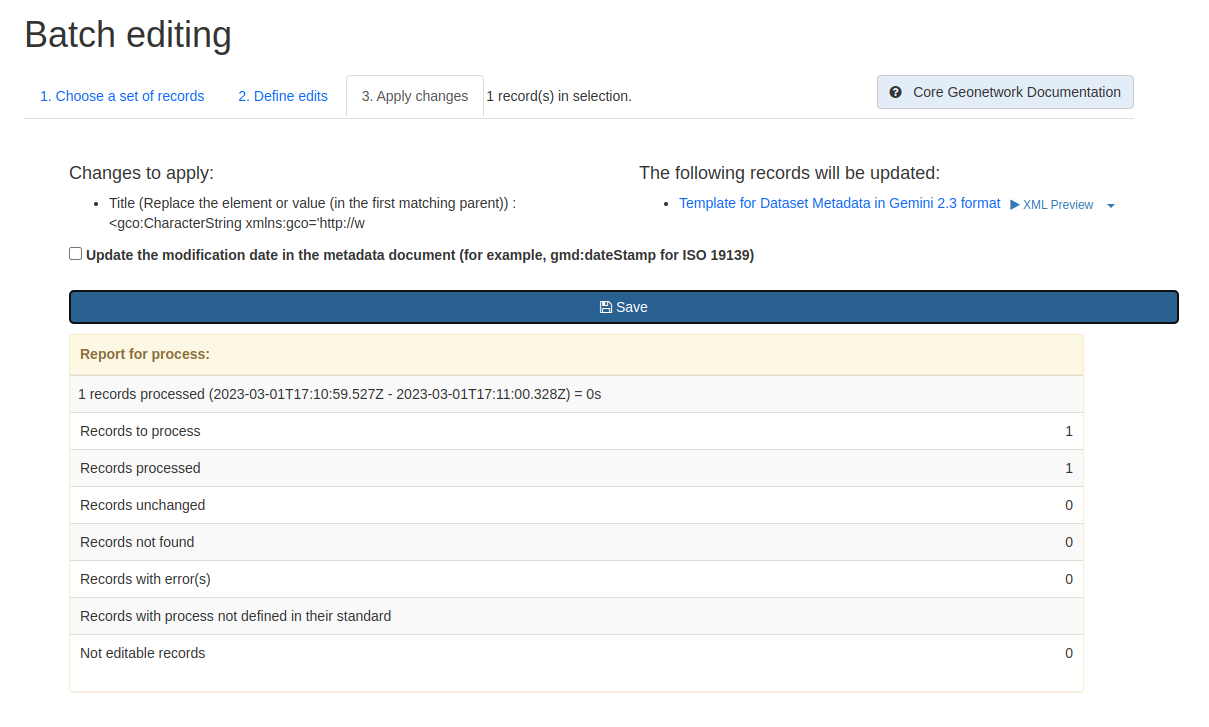 Figure 5.3.1: Batch editing tool showing the “Apply changes“ tab after changes have been applied
Metadata and Templates
The Metadata and Templates button provides access to four subsections, as shown in the image below:
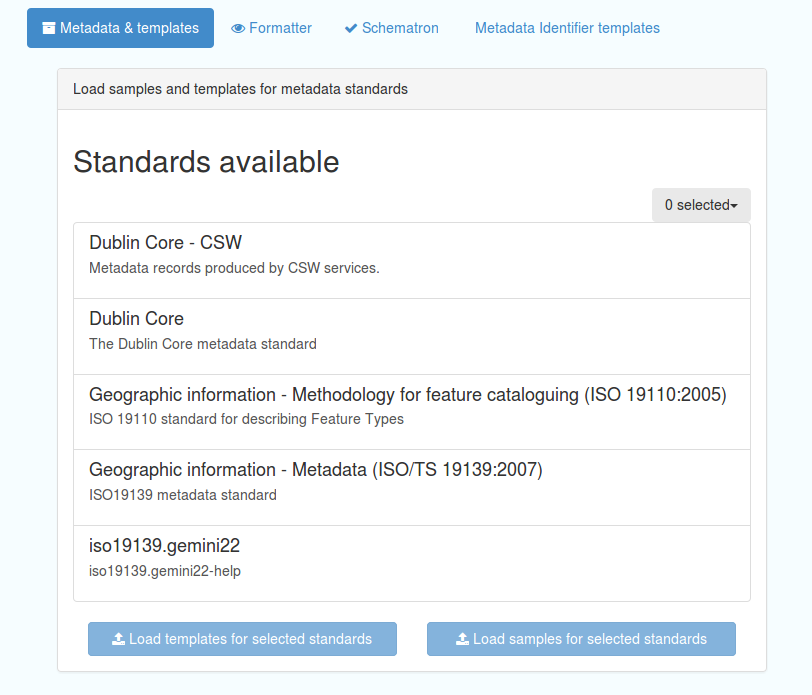
Figure 6.1.1: Metadata and Templates subsections
Metadata and Templates
This shows the metadata standards or profiles loaded onto the system. Selecting one or more of the standards activates the options to Load templates and Load samples for the selected standards.
Note that the templates have been already loaded for iso19139.gemini22
Standards
This shows information on the standards currently loaded in the catalog.
In GeoNetwork 4.2.x it is no longer possible to add new metadata standards via the user interface. To load a new standard, please contact the catalog administrator.
Formatter
Advanced
This allows advanced administrators/system maintainers to customise how metadata is displayed within Geonetwork. For further information on this topic see the Geonetwork help documentation at http://geonetwork-opensource.org/manuals/trunk/eng/users/customizing-application/creating-custom-view.html?highlight=formatter
Validation
Advanced
This section allows advanced administrators/system maintainers to see which schematron rules are in place for specific schemas and to edit them as required. It is not recommended that changes are made in this section as it will impact on how records are validated.
Metadata Identifier Templates
Advanced
By default this functionality is disabled in the admin settings, and identifiers are generated automatically by geonetwork when a record is created or imported. When enabled in the admin settings, this section allows the customisation of the identifier. The default is a randon UUID string, but identifier templates allow a pre-configured format with a template for rendering any user-generated elements. For example:
scot.gov::{IDCODE} would render the IDCODE as an element to be completed during metadata creation
scot.gov::{SLA}:{ID} would render both SLA and ID as elements to be completed during metadata creation
When this setting is enabled, additional options are available when creating a record from a template. When importing records, the existing file identifier element is used as the UUID. An error is triggered if this is not unique in the catalogue.
Harvesting
Harvesting allows you to consume metadata from external services on a scheduled basis. The Catalog harvesters section has three subsections, as shown in the image below. It also shows any existing harvester nodes set up on the system, and their current status (running or paused).
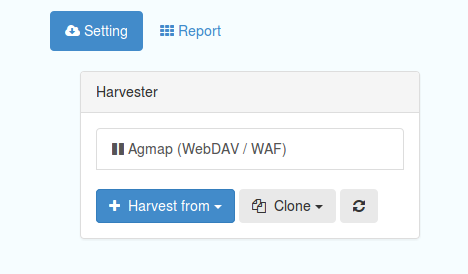
Figure 7.1.1: Catalog harvesters section
Catalog Harvesters
From this section you can see the list of available harvesting nodes, and clone an existing node or add a new one. You can also view and edit the settings of each harvester, see a harvester’s history and a summary of the metadata records harvested by each node.
To add a new harvester node, either clone an existing one by selecting it from the dropdown Clone list in the above image, or click the “Harvest from” button to access the dropdown list of harvester types. The configuration options available will depend on the type of node selected.
Settings
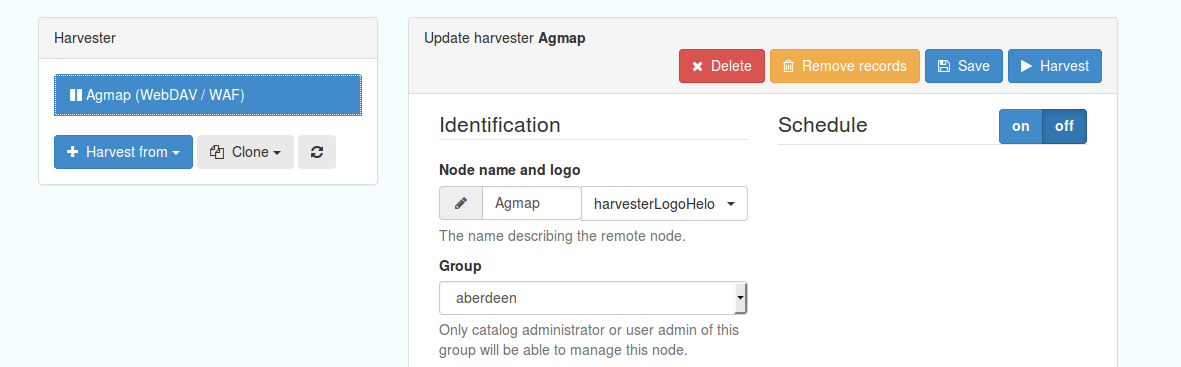
Figure 7.2.1: Common harvester node configuration options, top half of screen
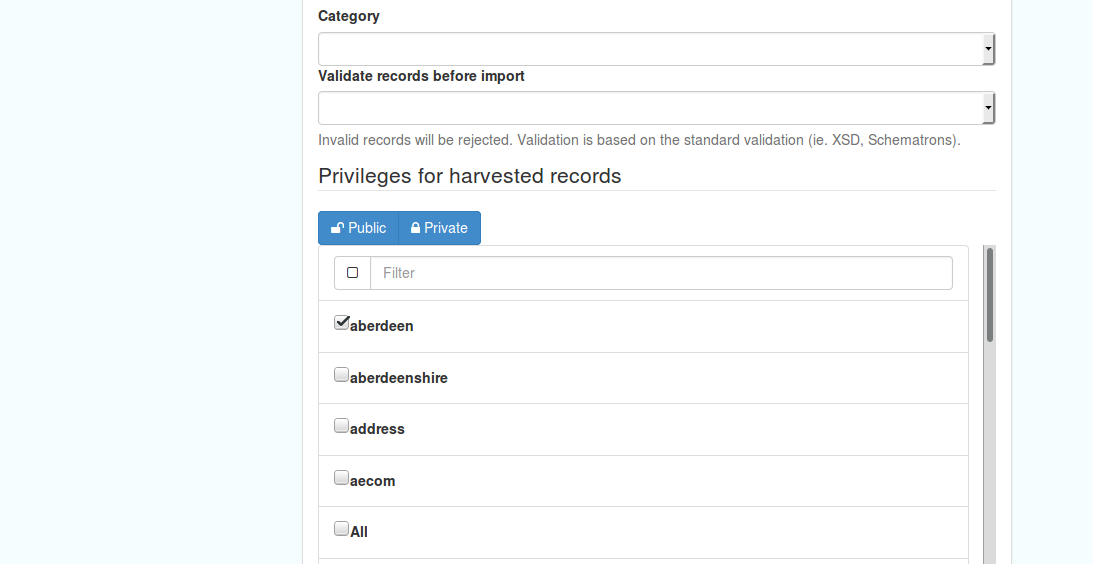
Figure 7.2.2: Common harvester node configuration options, bottom half of screen
Common configuration options are:
Node name and logo: a unique name and optional logo for this harvesting node
Group: The group that the harvester should belong to
User: The user that owns the harvested records
Schedule: Should the harvester run repeatedly to a schedule or just run the once
Delete: delete this harvester node and all related records
Remove records: delete records but leave harvester in place
Save: save changes to harvester configuration
Harvest: run this harvest
Action on UUID collision: what action should be taken if the same UUID is present on a record collected by another method. This has the following options:
Skip record (default)
Overwrite record
Create new UUID
License Type: set the licence under which the harvested records should be added
Validate records before import: Invalid records will be rejected. Validation is based on the standard validation (ie. XSD, Schematrons). This has the following options:
Accept all metadata without validation (this option will import all records regardless of validity)
Accept metadata that are XSD valid (this option will cause the harvest to fail on the first invalid record)
Accept metadata that are XSD and Schematron valid (this option will cause the harvest to fail on the first invalid record)
For information on the configuration options for the different harvester node types, see the Geonetwork documentation at http://geonetwork-opensource.org/manuals/trunk/eng/users/user-guide/harvesting/index.html
Harvester history
This subsection shows a history of each harvest and the number of records harvested each time the node ran.
Metadata records
This subsection displays a summary of the records. The harvested records can be filtered by Available in, Type of resources, Keywords and Indexing errors.
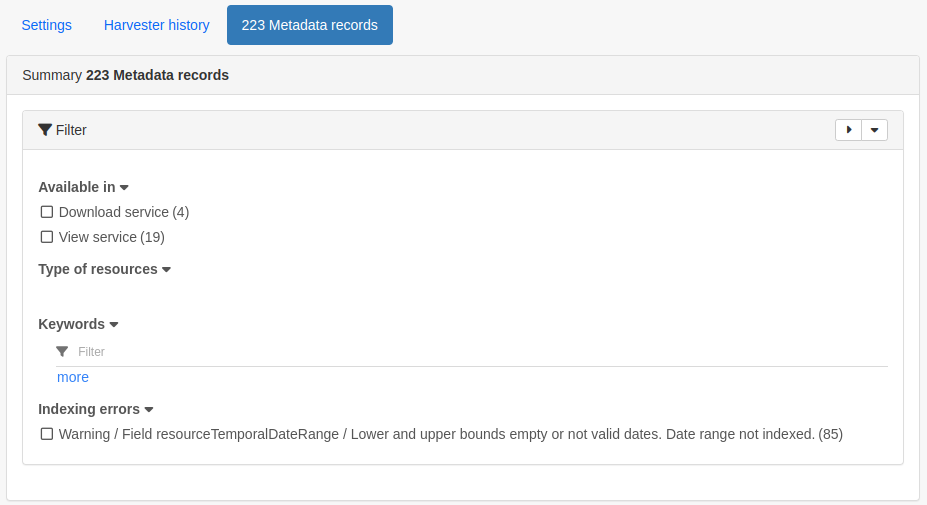
Figure 7.3.3: Harvested records filters, top half of the screen
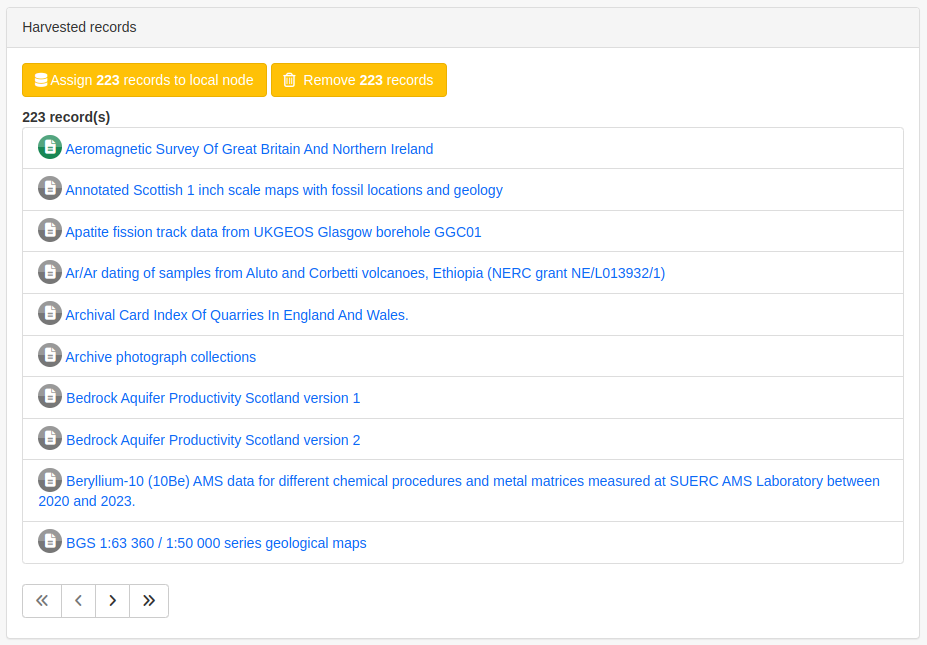
Figure 7.3.4: Harvested records filters, bottom half of the screen
The filter facets can be expanded by clicking on the  or collapsed by clicking on the
  at the top right corner of the summary box.
A list of the filtered records can be reviewed in the harvested records subsection and filters can be cleared by clicking on the  .
.
Filtered records can be removed in bulk by clicking the  button.
Note: this will PERMANENTLY delete the records from the catalog.
Harvester Reports
This section allows you to see the harvester history for all nodes and export the results as a CSV file.
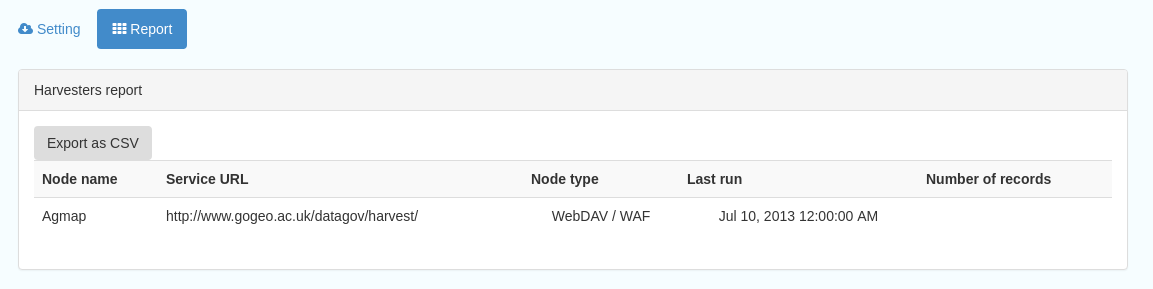
Figure 7.4.1: Exporting harvest history as a CSV
Feature Harvesters
Here are listed the ongoing and finished jobs for indexing features from remote WFS services. Once indexed, features can then be filtered according to their attributes and the filter applied to the original map layer.
Note: This feature is not currently being used in this implementation.

Figure 7.5.1: WFS Indexing Dashboard
To add a new WFS harvester click the  button at the top right of the page.
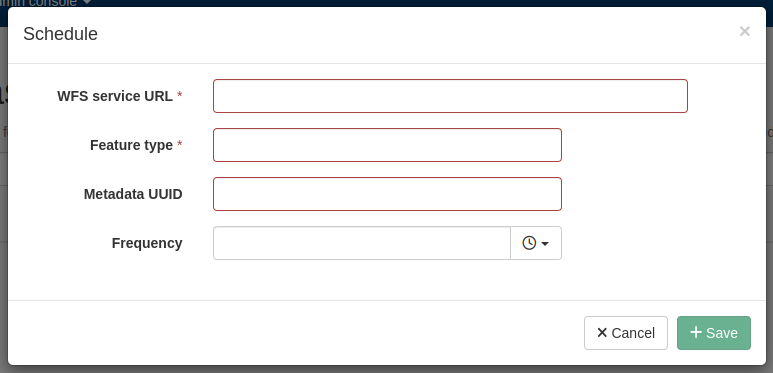
Figure 7.5.2: Adding a WFS harvester
Statistics and Status
This section provides a range of metrics and information on the health of the Geonetwork installation and the activity on it. It is split into several subsections.
Status
This subsection should be the first port of call if there are any problems with the catalog. If the catalog is under a low load and is performing optimally then the status page should look like the one below:
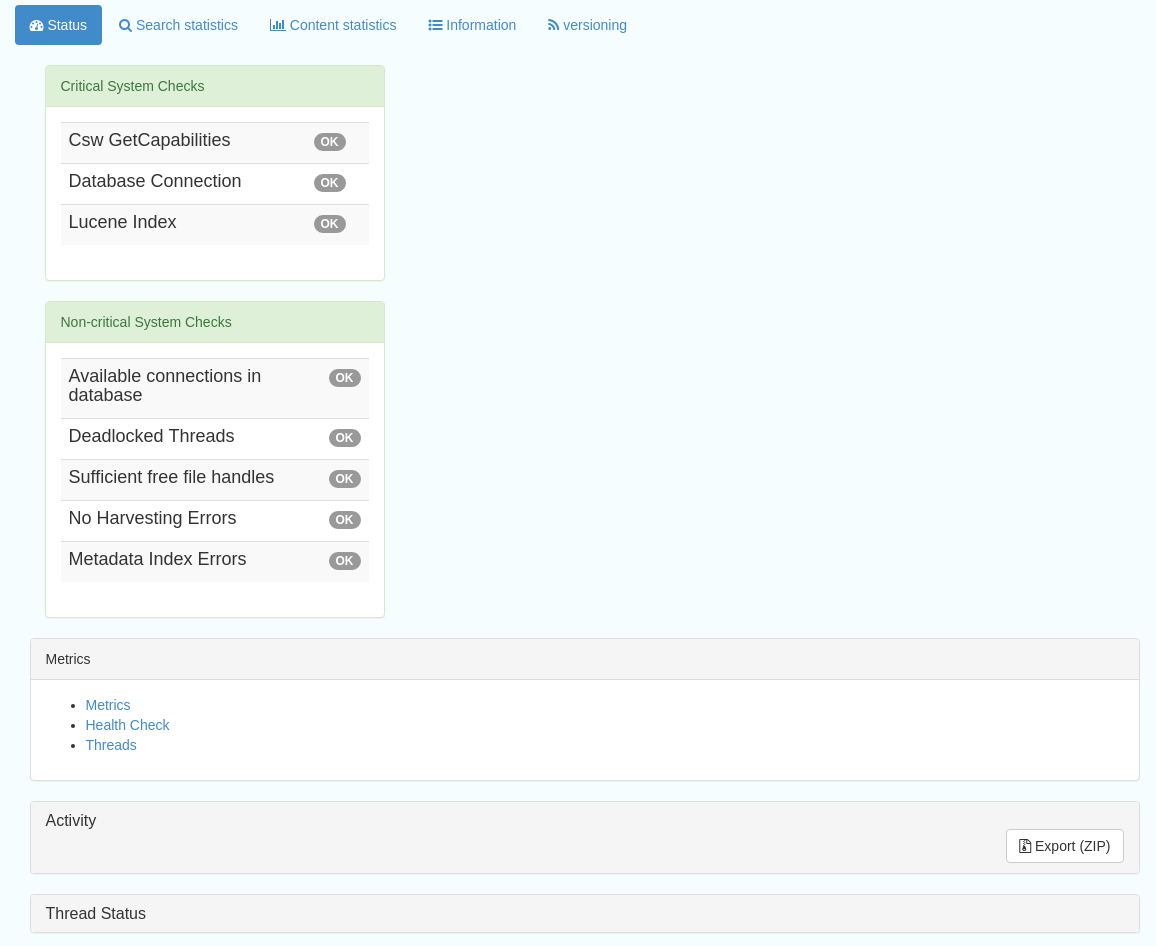
Figure 8.1.1: Status page showing catalog performing optimally
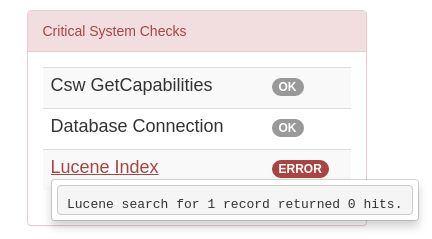
Figure 8.1.2: Status page showing error, with detailed error message accessed by clicking on red link
Report any errors shown here to Astun Technology.
The metrics links provide advanced information on the status of the system and should not generally be needed. The Activity “Export (zip)” provides a log file from the server. This may be requested by Astun Technology support staff. This download could be large and may take some time. The Thread Status link provides advanced information on the java installation, and should not generally be needed.
More detailed metadata indexing errors can be seen on the right hand side of the screen (if there are any). These can be filtered by Error types, Harvested, Indexing errors and Indexing warnings.
Filtering by one or more of these criteria will produce a list with the affected records in the bottom half of the page. The filter can be removed by clicking in the search bar.
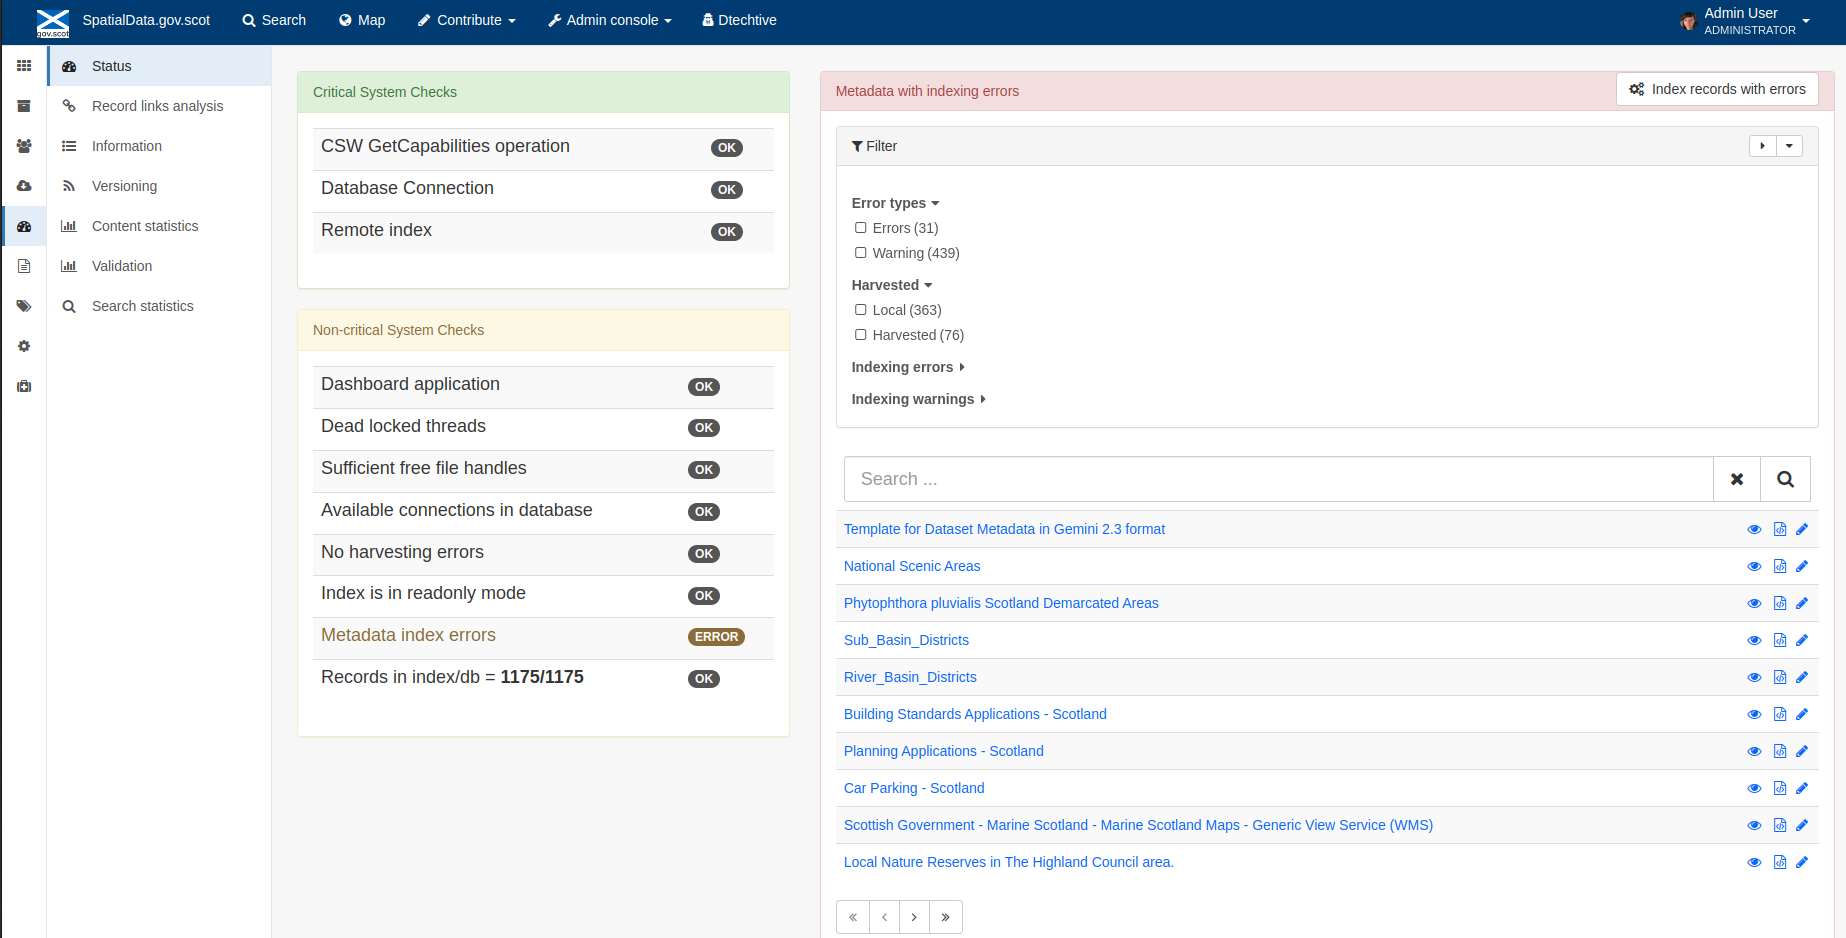
Figure 8.1.3: Status page showing metadata with indexing errors
Record Links Analysis
This subsection provides a list of all record links analyzed.

Figure 8.2.1: Record links analysis page
At the top right of the page there are the following options:
Analyze all records
Remove all- this will permanently remove all links and status history (a confirmation prompt will be displayed)
Download (CSV)
The links can be filtered by Group, Published in that group (only published records in a group) and Choose a selection (Editor board or Search app selection)
The links can also be sorted by the following criteria (in order from left to right):
Valid / Invalid / Unknown status first
URL- a specific URL can be typed or pasted in the search box. Alternatively the links can be sorted alphabetically.
Last check
Status
Associated records- a specific UUID can be typed or pasted in the search bo.x
Links can be tested all at once (by clicking the  button at the top right)
or individually (by clicking the
button at the top right)
or individually (by clicking the  button at the end of the record’s row).
Information
This subsection provides information on the Geonetwork installation on the server. This section is for advanced administrator/system maintainer use.
It comprises the following sections:
Catalog information- where the files and folders are located on the server
Database- the connection status and connection string for connecting to the database
System information- the version of java in use and the amount of memory being consumed
Index- information about the configuration of the search index
Versioning
If metadata versioning is enabled on the server, which it is not, by default, then this section provides information about this process. This section is for advanced administrator/system maintainer use only.
Content Statistics
This subsection provides more information on content searches. The following options are available, for export as CSV:
Catalog content statistics, such as the number of harvested records, total number of records, number of public records and so on
Metadata records popularity, showing the most popular records searched for (clicking the blue eye icon to the right of a record will take you to it)
Best Rated, showing the most highly rated records (if local star ratings are being used)
Record statistics, this is a dropdown list with a number of available metrics, for example (but not limited to):
Year
Format
INSPIRE theme(s)
Contact for the resource
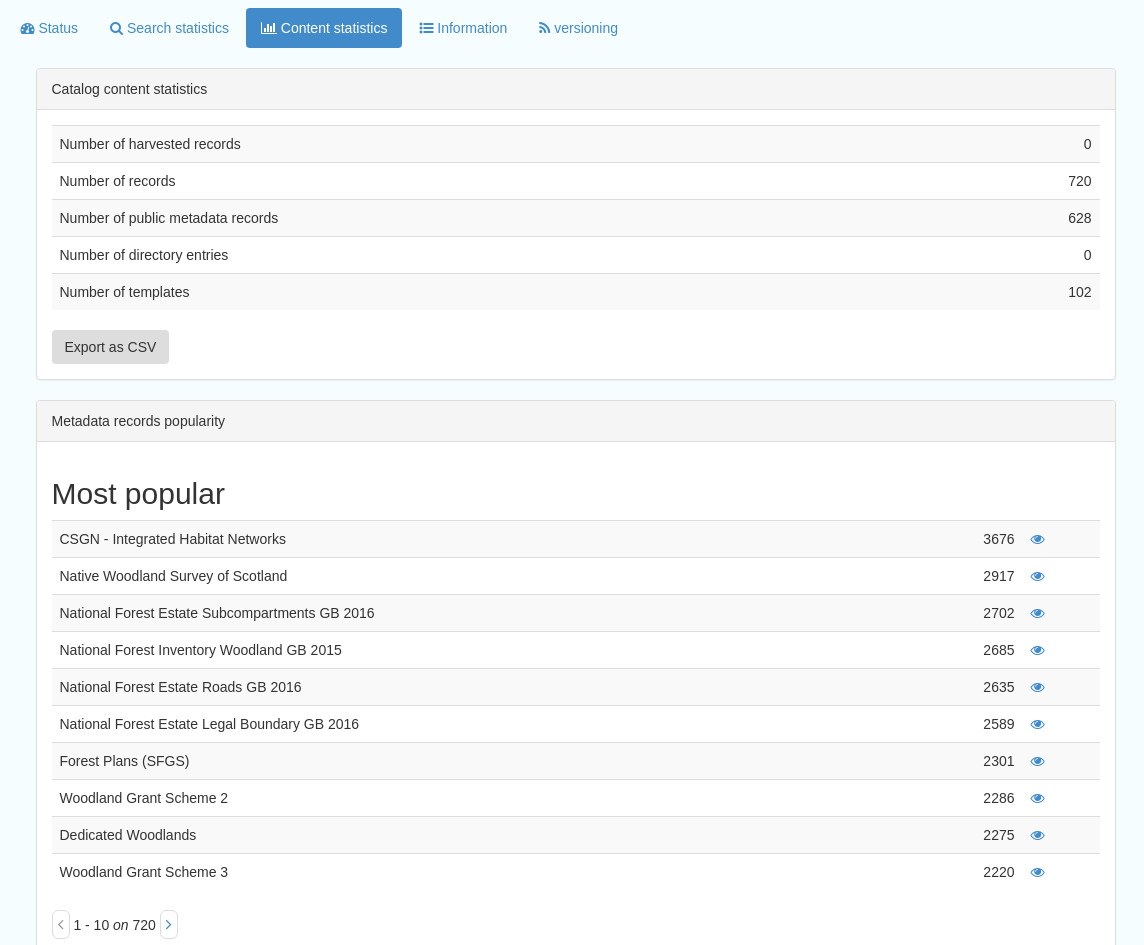
Figure 8.3.1: Catalog content statistics and Most popular records
A number of pie charts, showing the following metrics, where hovering over a slice will provide the actual number of records:
Category
Owner
Workflow Status
Validation Status
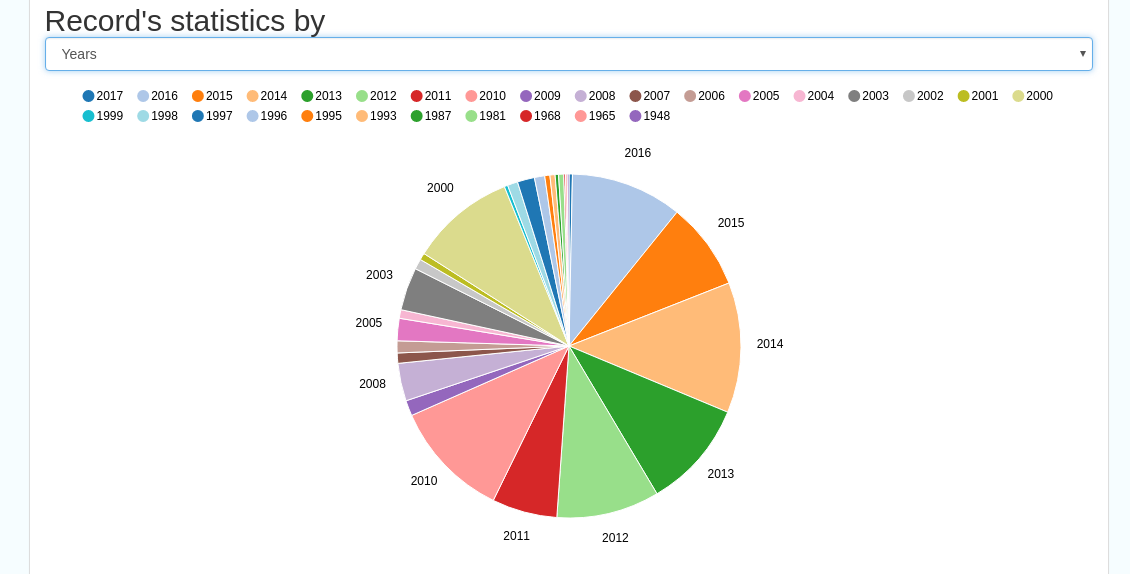
Figure 8.3.2: Record statistics by Year
Validation
Search Statistics
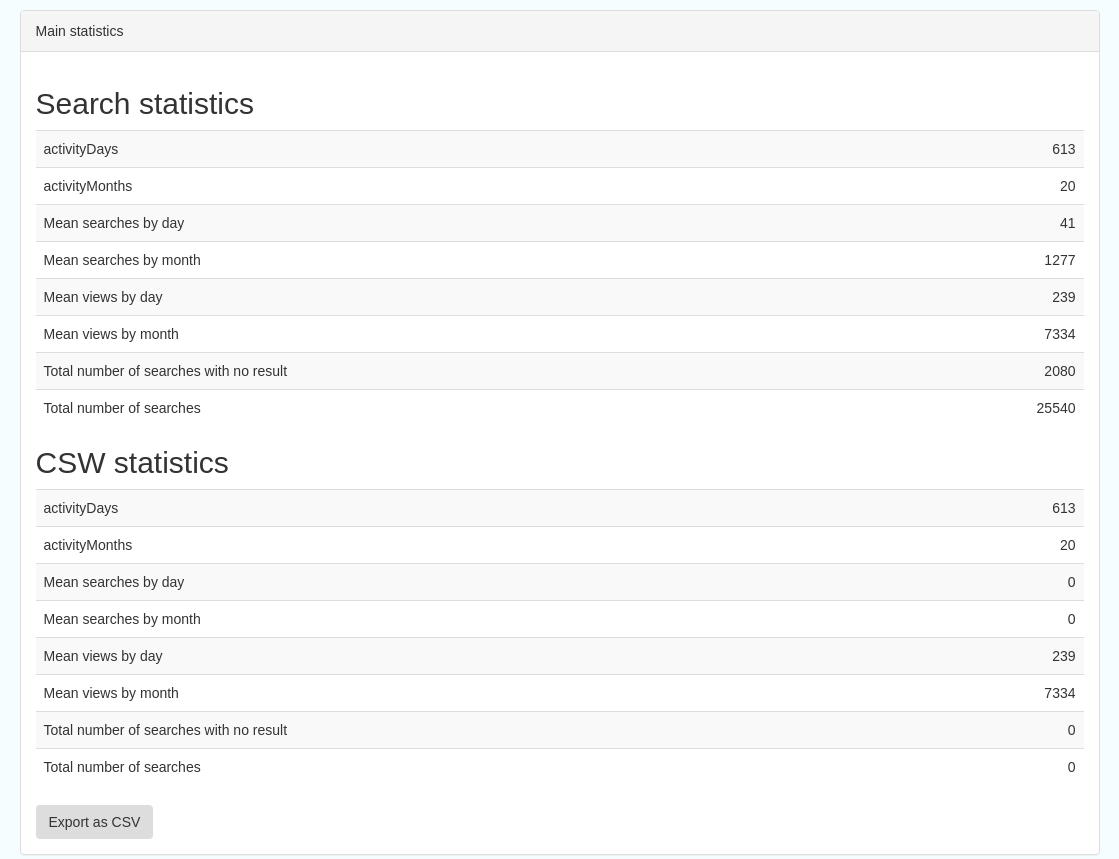
This is an extensive subsection showing the following, all additionally available for export as CSV:
Search statistics, such as the number of catalogue views by day or month
Statistics for the CSW endpoint
Number of searches by timeperiod and type, shown as a graph
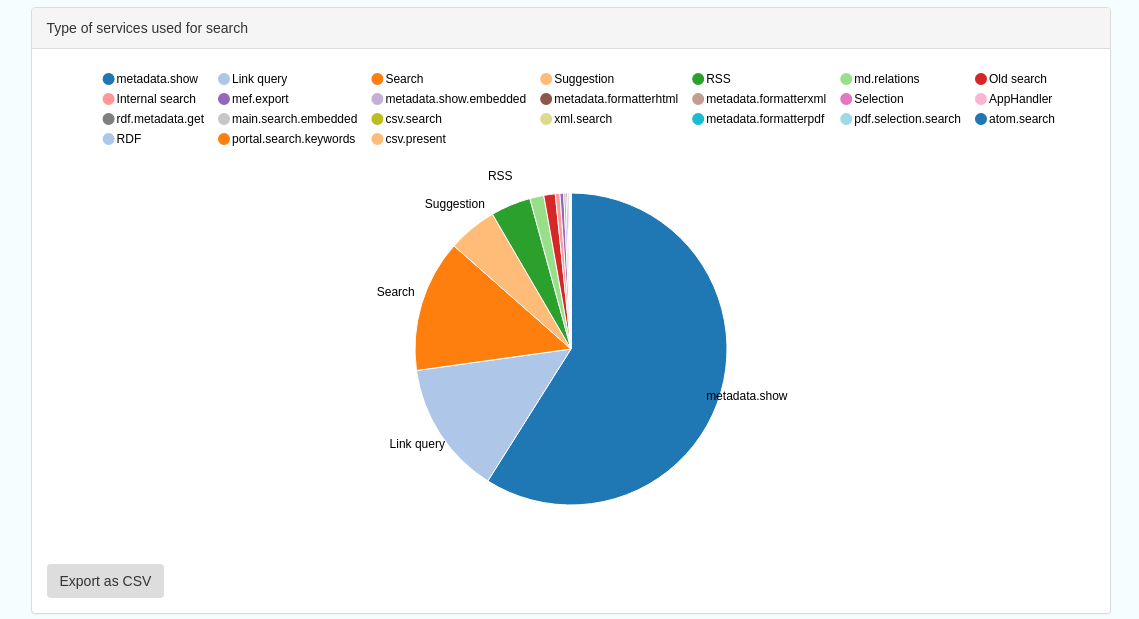
Types of services for which a search is triggered, such as export to MEF, RDF, keyword search in portal, shown as a Pie Chart
IP address for each search
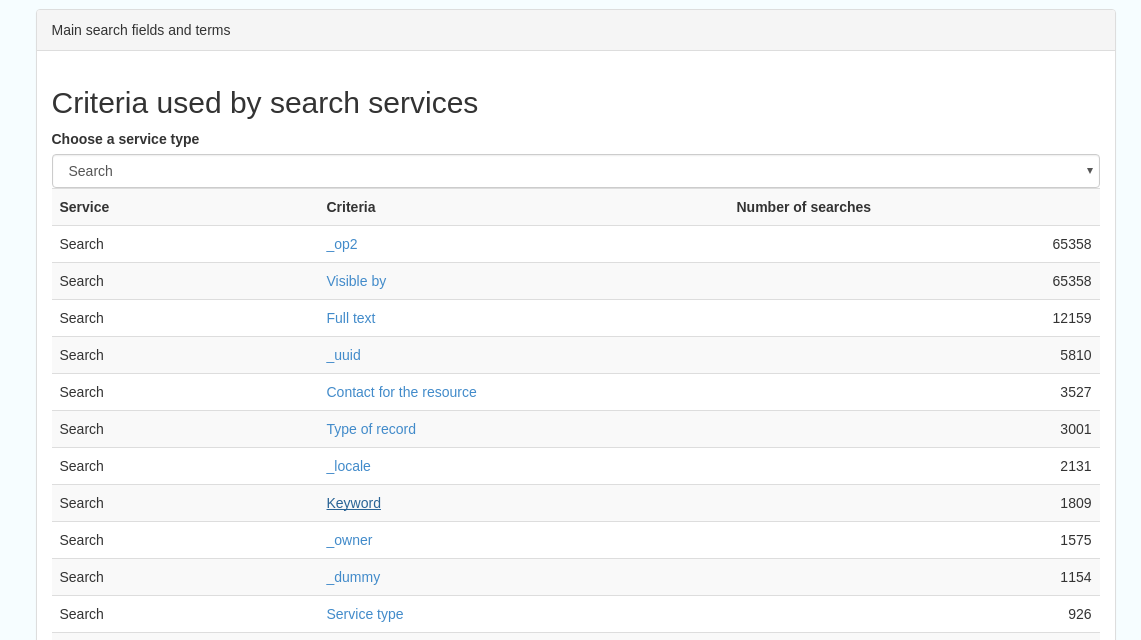
Search fields and terms
This allows the choice of the type of search, which then displays the criteria used and the number of searches
Clicking on a criteria shows the breakdown of number of searches per term for that criteria
For example, to see a breakdown of search keywords, choose “Search” from the dropdown box and then click the “Keyword” link in the list below (see Figure 4.2.3)
Figures 8.4.1/2/3: Various elements of the search statistics interface
Reports
This section contains various downloadable reports on user activity in the catalog. Each provide the option to choose a date range, and the option to filter by group. The resulting reports are available for download as a CSV. The following reports are available:
Updated metadata- can be used to find records that have been, or not been, updated within a specific timeframe
Internal metadata- can be used to find records that are only available within their group
Metadata file uploads- shows records for which data has been attached (not used within SSDI)
Metadata file downloads- shows records for which data has been downloaded (not used within SSDI)
Users access- shows user names, emails and last login dates
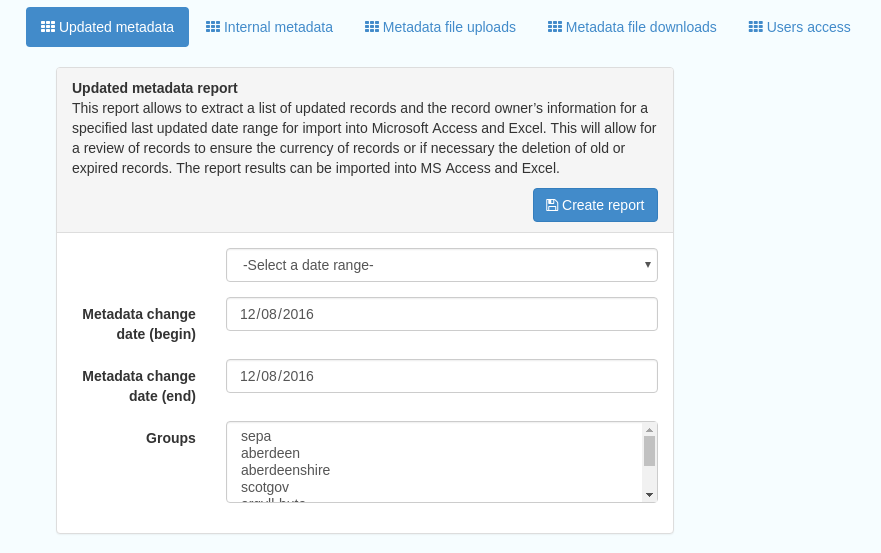
Figure 9.1.1: The reporting section
Classification Systems
This section provides access to the Thesauri and other Categories used within the catalog. It is split into two subsections.
Thesaurus
Thesauri in SKOS format (XML or RDF extensions) can be managed or added here. It is also possible to interrogate the existing thesauri loaded into the catalog.
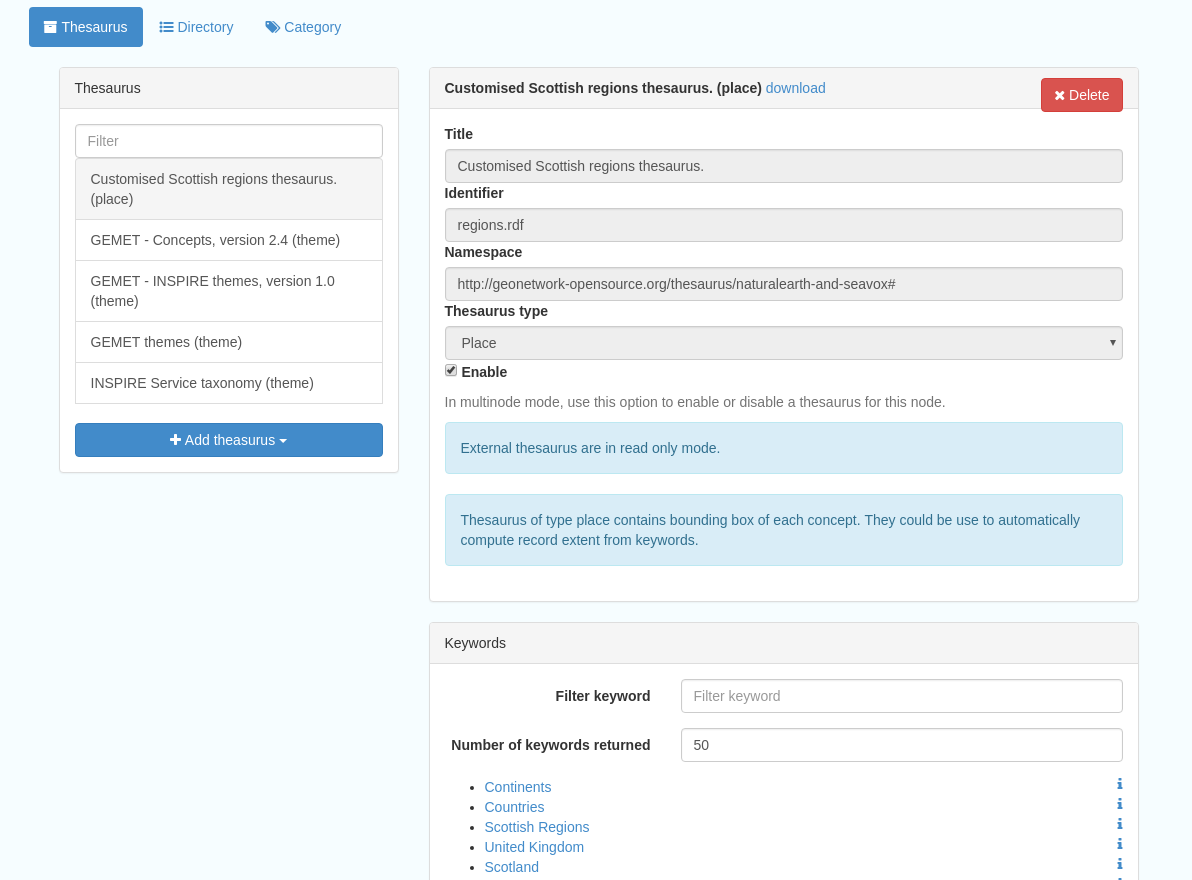
Figure 10.1.1: The thesaurus subsection showing the customised Scottish Regions thesaurus
Selecting a thesaurus from the list provides further information about it. The settings here should not be changed as they will affect the working of the catalog.
It is possible to add additional thesauri by clicking the “Add thesaurus” link. The options are as follows:
From registry
From local file - upload a thesaurus in SKOS format (XML or RDF extensions) from your local hard drive
From URL - provide a link to a compatible thesaurus online
New thesaurus - build one from scratch in Geonetwork
Categories
This subsection lists the categories that records can be added to, and provides the option to add new categories or delete existing ones.
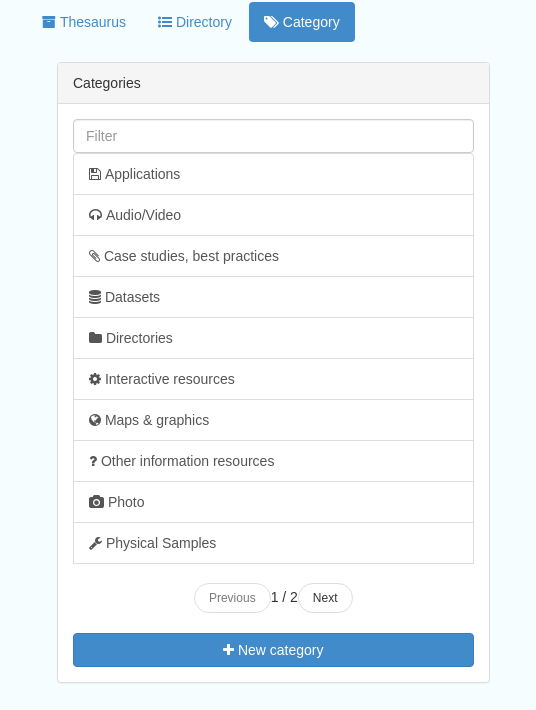
Figure 10.2.1: Category list
Selecting a category from the list brings up a dialogue where it’s display name can be edited in each of the languages enabled in the catalogue, along with the options to save changes or delete the category.
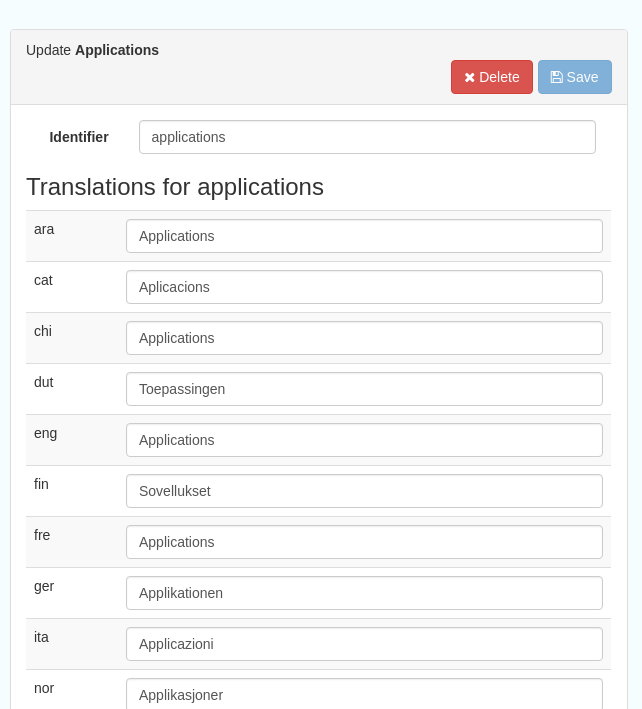
Figure 10.2.2: Selecting a category and displaying additional options
To add a new category, click the “New category” button shown in Figure 10.2.1 above. Add an unique name for the category and save it. To change it’s display name in any of the available languages, select it from the category list and edit as shown in Figure 10.2.2 above.
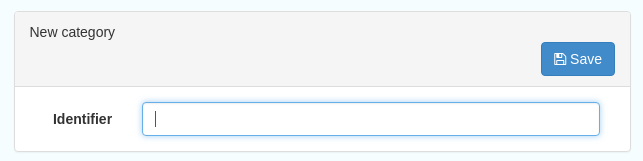
Figure 10.2.3: Adding a new category dialogue window
Users and groups
This section is where existing users and groups are managed, and new ones are added. There are two subsections, described below.
Manage groups
This subsection allows you to list and edit the existing groups in the catalog, and add new ones. Groups are listed on the left, and selecting a group brings up additional options, shown below, with the option to save any changes or delete this group.
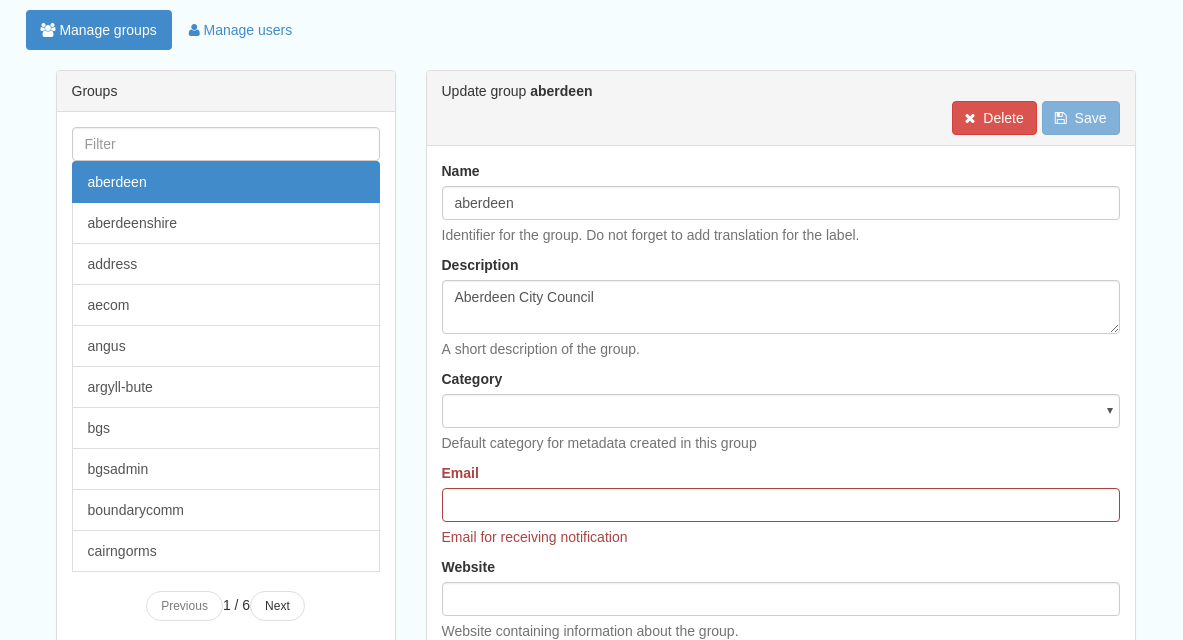
Figure 11.1.1: The groups list and top half of the groups editing interface

Figure 11.1.2: The middle section of the groups editing interface
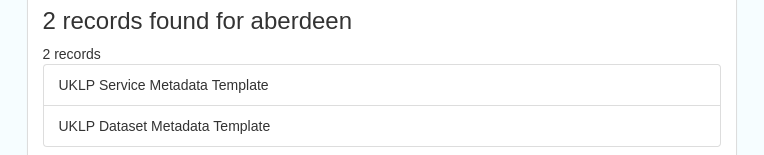
Figure 11.1.3: The lower section of the groups editing interface (intermediate section on translations for this group name not shown)
To add a new group, click the blue “New group” button below the list. This brings up the same dialogue shown in figures 11.1.1-11.1.3.
Manage Users
This subsection allows you to list and edit the existing users in the catalogue, and add new ones. Users are listed on the left, and selecting a user brings up additional options, shown below, with the option to save any changes or delete this user. For exsiting users there is also the option to reset the password.
The settings for editing or creating a user are as follows:
Enable (default is yes)- allow this user to log in, or not
User name (mandatory)- the name the user should use to log in
Password (mandatory, not shown for existing users)
Name (mandatory)
Surname (mandatory)
Email (mandatory)
Organisation (optional)
Address fields (optional)
Select user groups per profile fields:
Is an administrator (default is no)- if checked the user will be a full administrator for the whole catalogue with full access to all functionality for all groups
Profiles per group- if not a full administrator then the user needs to be assigned at least one role or profile within the catalogue. Note that a user can be part of multiple groups and have different profiles per group
Registered User: can download protected data
Editor: has rights to create/delete/edit metadata within their group
Reviewer: has rights to authorise publication of metadata within their own group
User administrator: has rights to administer users, and create/delete/edit metadata within their group
Records owned by this user (if any)
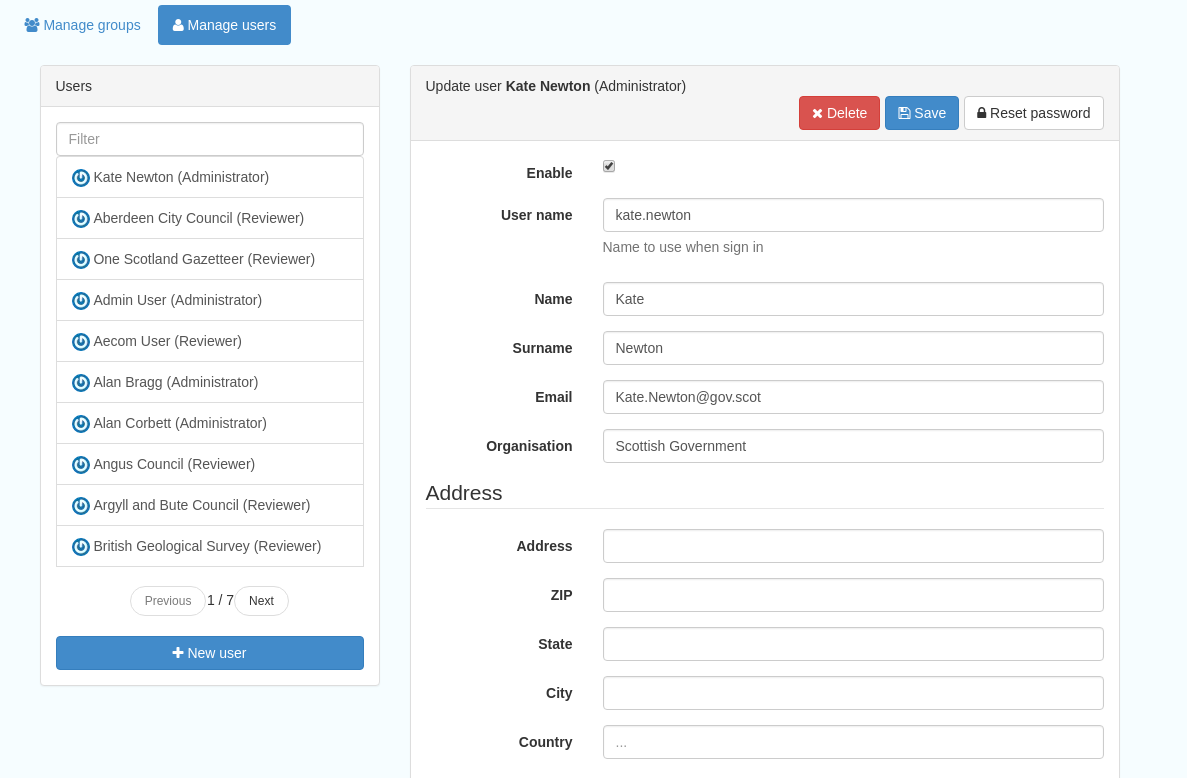
Figure 11.2.1: The users list and top section of user editing interface
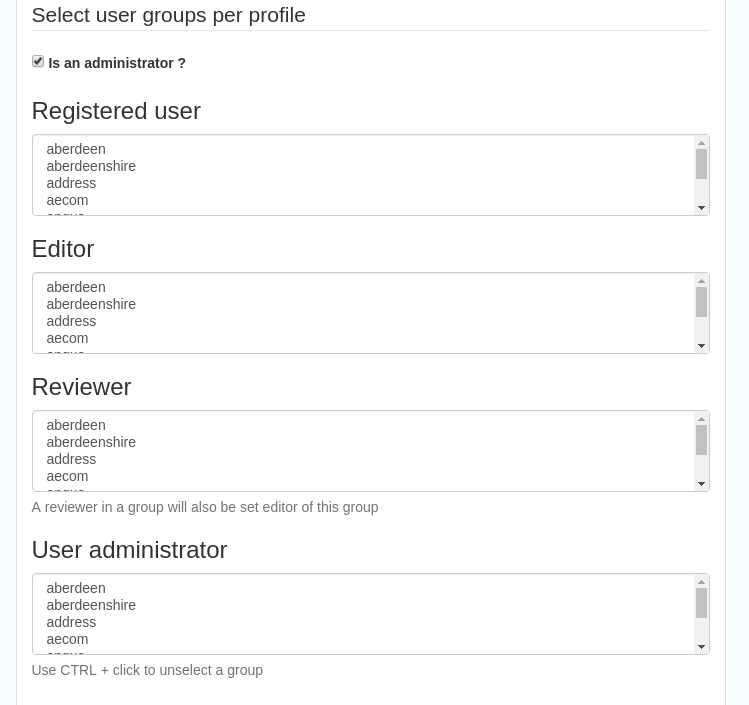
Figure 11.2.2: The middle section of the user editing interface
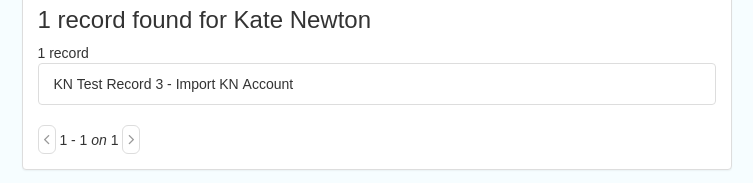
Figure 11.2.3: The lower section of the user editing interface
Settings
This section should be used only by advanced administrators and system maintainers. This section is where the main configuration of for the installation is set up. It contains a number of subsections, as described below, but in general settings should only be changed by experienced staff as they can have an adverse effect on the running of the site.
Settings
The settings subsection provides access to the main configuration for the installation.
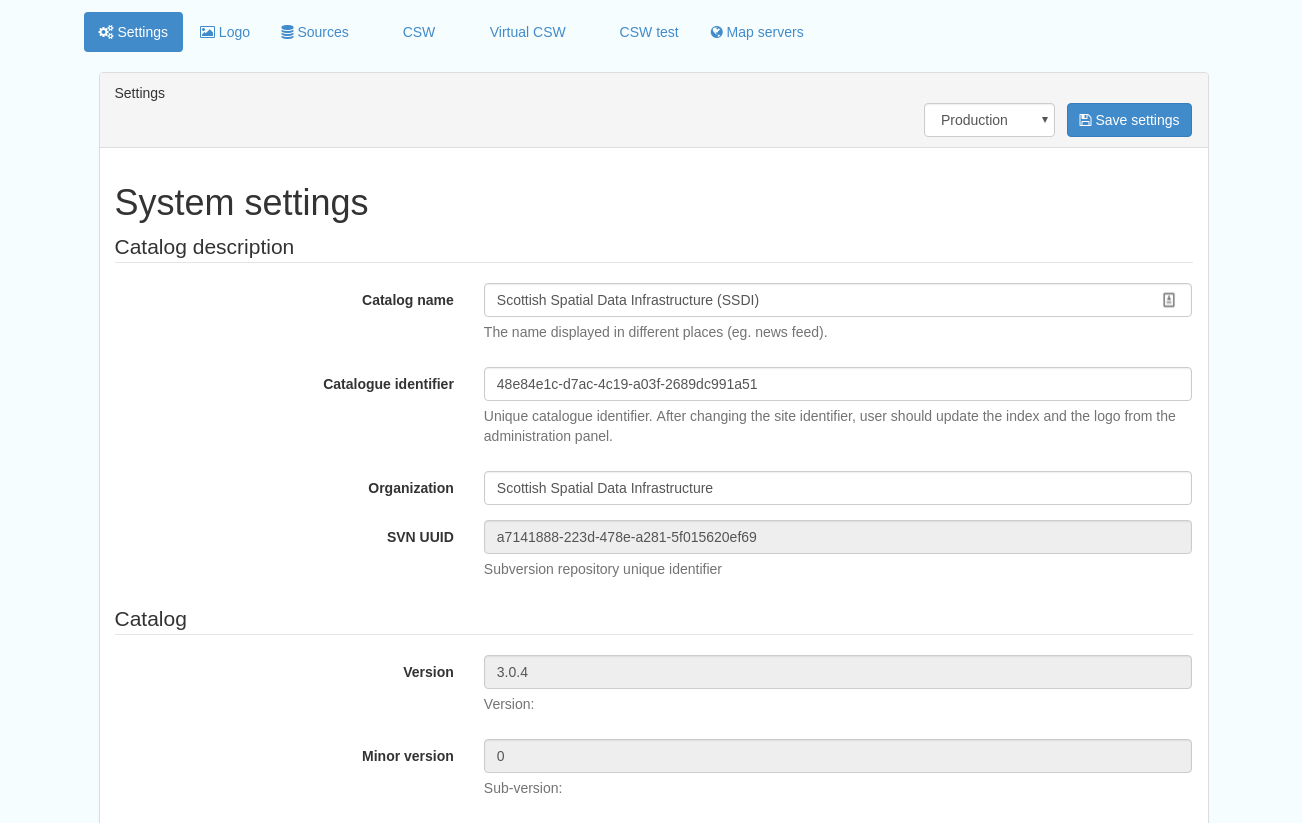
Figure 12.1.1: The settings panel
The various elements are described in detail in the Geonetwork documentation at http://geonetwork-opensource.org/manuals/trunk/eng/users/administrator-guide/configuring-the-catalog/index.html so not all elements are described below, but there are some sections that may be useful:
Log levels- there are two of these, accessed via dropdown lists. The first is at the top of the settings panel, next to the “Save settings” button. The second is in the Catalog server subsection. The default for both is “Production” and this level should only be changed if increased logging is specifically requested. In that case, change to “Dev” and save settings, but remember to set it back to “Production” for normal use!
Catalog description- the Catalog name and Organisation are used throughout the catalogue and can be changed as required
Organization- this is also used throughout the catalog and can be changed as required
Catalog- shows the version of Geonetwork in use
Catalog server- shows the URL and protocol (http or https) being used. Changing these values will trigger a change to internal URLs within the metadata records
Metadata Search Results- limits how many records can be selected in a single operation. Increasing this value may have a negative impact on the performance of the server
Catalog Service for the Web (CSW)- should this be enabled (default is yes). Note that there is a known issue where the option to set a contact to be used for GetCapabilities does not work. This is being investigated, and can be set elsewhere. In general the default settings for this section should be used.
User self-registration- if this option is set (default is no) then visitors to the catalogue can register as users (with the Registered User profile)
User feedback- deprecated in version 3.0.0 onwards
Search statistics- if enabled (default is yes) then Geonetwork will save statistics on searches in the database
INSPIRE Directive configuration- this section enables INSPIRE options in the CSW response from the catalogue and enables the INSPIRE search options in the advanced search panel.
Harvesters- allow editing on harvested records- if this is set (default is no) then records harvested from a remote location can be edited. Note that, if set, any changes would be overwritten by subsequent harvests
Harvester- this section contains settings to alert if a harvest has succeeded or failed. It is not configured by default
Metadata configuration- this section contains settings on which views are available, which is the default, and whether group logos should be used for records. The default values are generally sufficient
Metadata workflow- this section includes sections on the publication of invalid metadata. If the publication of invalid metadata is disabled, it is also possible to automatically set the status of invalid records to unpublished, and to force validation when a metadata record is saved.
The remaining settings are generally only configured on installation and should only be changed by experienced administrators or system maintainers.
Logo
This subsection is where logos are uploaded and/or deleted, and where the main catalog logo is set. New logos can be uploaded using the green “Choose or drop images here” button, and the current catalog logo is shown on the left. For logos that have been uploaded, there are options (icons, from left to right) to set as the catalog logo, set as the favicon, or delete.
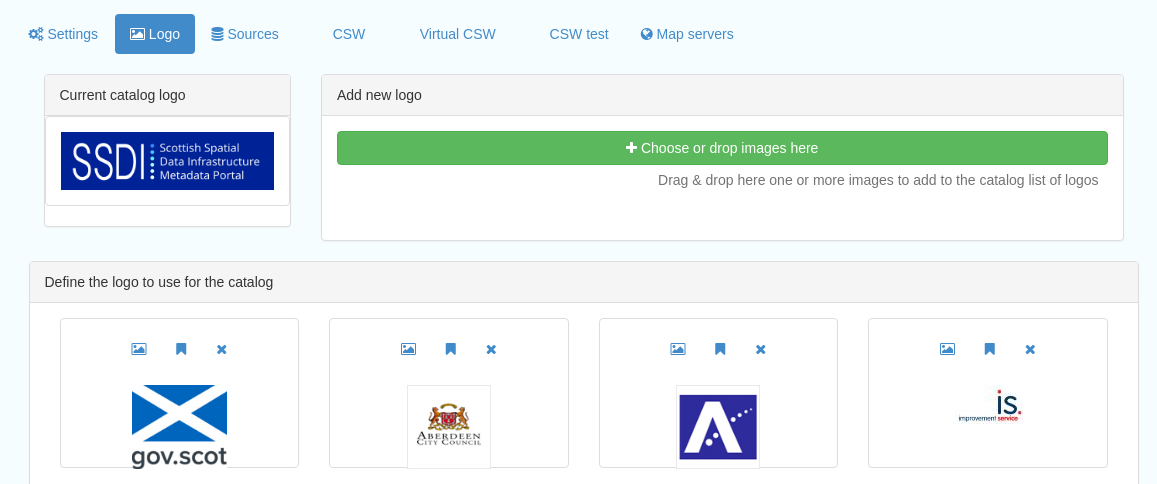
Figure 12.2.1: The logo configuration interface
How various logos are pulled across in GeoNetwork
Contact for the resource- Organisation logo
This appears on the record’s default view in the Contact for the resource section, below the Technical information and Lineage/Specification conformance sections.
![]()
Figure 12.2.2: A logo displayed in a record’s Contact for the resource section
The information displayed here comes from the record’s gmd:pointOfContact/gmd:CI_ResponsibleParty information like so:
gmd:role/gmd:CI_RoleCode determines the role (in the example above- Publisher)
gmd:organisationName determines the organisation name (in the example above- Scottish Government)
gmd:electronicMailAddress determines the logo- the domain has to match a logo name loaded in the catalog (in the example above the domain is gov.scot so the logo name has to be gov.scot.png)
Note: It’s important to note that the file extension for the logo has to be PNG, otherwise the logo won’t be associated with the resource and thus won’t be displayed.
Metadata information- Organisation logo
This appears on the record’s default view in the Metadata information section, below the Contact for the resource section.
![]()
Figure 12.2.3: A logo displayed in a record’s Metadata information section
The information displayed here comes from the record’s gmd:contact/gmd:CI_ResponsibleParty information like so:
gmd:role/gmd:CI_RoleCode determines the role (in the example above- Point of Contact)
gmd:organisationName determines the organization name (in the example above- Scottish Government)
gmd:electronicMailAddress determines the logo- the domain has to match a logo name loaded in the catalog (in the example above the domain is gov.scot so the logo name has to be gov.scot.png)
Note: It’s important to note that the file extension for the logo has to be PNG, otherwise the logo won’t be associated with the resource and thus won’t be displayed.
Provided by- Group logo
This appears on the record’s default view within the Metadata information section in the Provided by sub-section, below the Metadata language sub-section.
![]()
Figure 12.2.4: A logo displayed in a record’s Metadata information section, in the Provided by sub-section
The information displayed here comes from the record’s group information.
The name of the group is displayed if the mouse hovers over the logo. Both the name and the logo for the group can be set in Admin console > Users and groups > Manage groups.
The group owning a record can be changed from the record’s editing view by selecting a group from the Group dropdown menu in the toolbar.
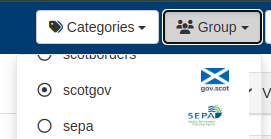
Figure 12.2.5: The roup dropdown on the record’s editing view
Sources
This subsection is only used when a number of different sources are used for loading the data, such as harvesting nodes.
CSW
This subsection provides more detailed options for configuring the CSW service for the catalogue. In general the default options are sufficient.
The Contact setting allows the choice of a user within the catalogue to populate the contact information in the CSW GetCapabilities request. A specific user “Metadata Contact”, has been set up for this purpose.
The CSW Service information setting allows the configuration of some of the GetCapabilities elements, such as the Title, Abstract and so on. Fields are selected using a dropdown list, the language is chosen (default is English), and then the Value for the given setting can be added.
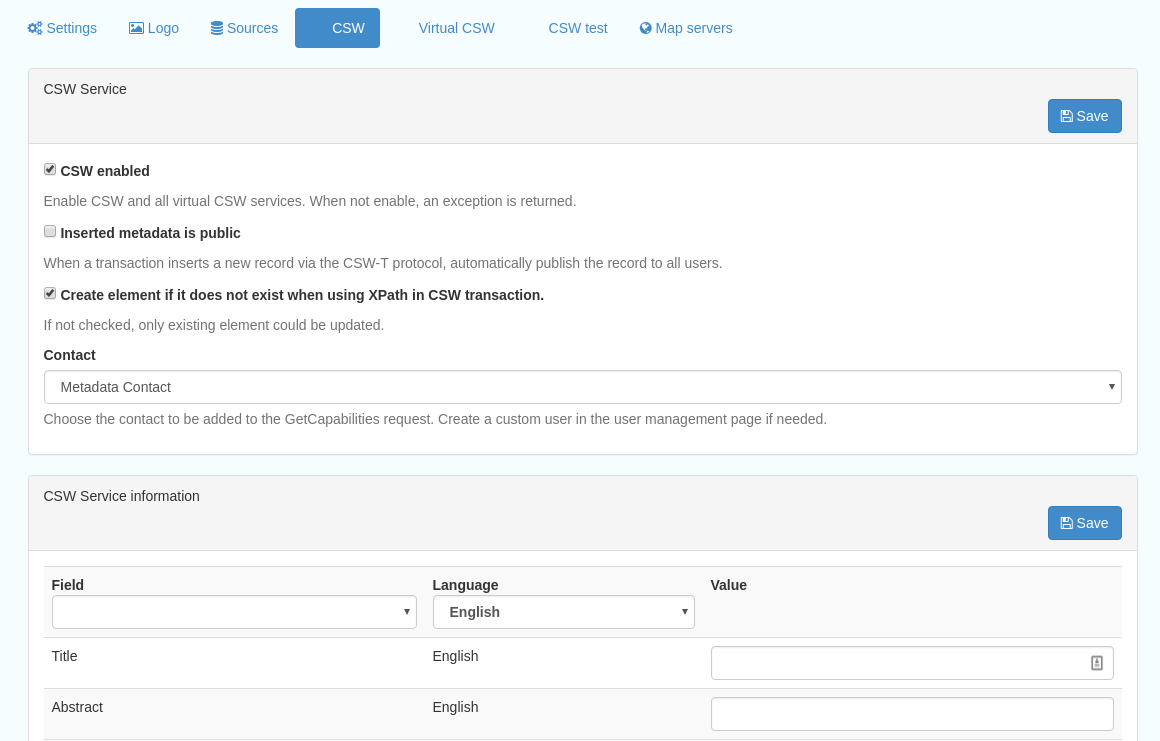
Figure 12.3.1: The CSW settings interface
CSW test
This subsection allows you to test various CSW requests on the standard endpoints or any virtual endpoints configured. The endpoints are displayed as radio boxes and the available requests are accessible from a dropdown list. Where it is necessary to adjust a parameter, such as a search term or record ID, this can be done in the XML section. To run the request click the green “Send CSW request” button. The response will appear below.

Figure 12.5.1: Results of CSW “GetRecordById” request to the standard catalogue CSW endpoint, for record with ID 9d31b891-b896-49f8-bcea-9787f79dd5f8
Map servers
This subsection allows you to set up the catalogue as an OGC publisher for WMS/WFS/WCS. In order to configure this section a Geoserver or Mapserver instance must be installed on the server. Not currently implemented in this installation.
Tools
This section contains some tools that can be run when maintenance is needed on the server. The subsections are as follows:
Catalogue admin tools
In general it is not necessary to run these tools unless transferring a large number of metadata records, changing the catalog’s appearance, or if unexpected search results are reported. The tools are as follows:
Reindex records- if changes have been made to the database. Note: While rebuilding index, the search may return incomplete results and the CSW GetRecords operation is disabled
Delete index and reindex
Commit index changes- use only if indexing task is hanging
Delete and create data index- completely remove the index containing data and recreate it
Clear XLink cache- if directories are added or changes have been made to the catalog that would affect the structure of xlinks (such as to the URL or protocol), clear the cache
Clear Formatter cache- if changes have been made to the catalog’s display (schematron views, or text strings), clear the cache
Clear JS & CSS cache- if changes have been made to the catalog’s JS or CSS, clear the cache
Clear translation packs cache- if changes have been made to the catalog’s JSON translation files of the Javascript application in catalog/locale, database translations or schema JSON translations, clear the cache
API doc & test- documentation and testing page for the GeoNetwork API
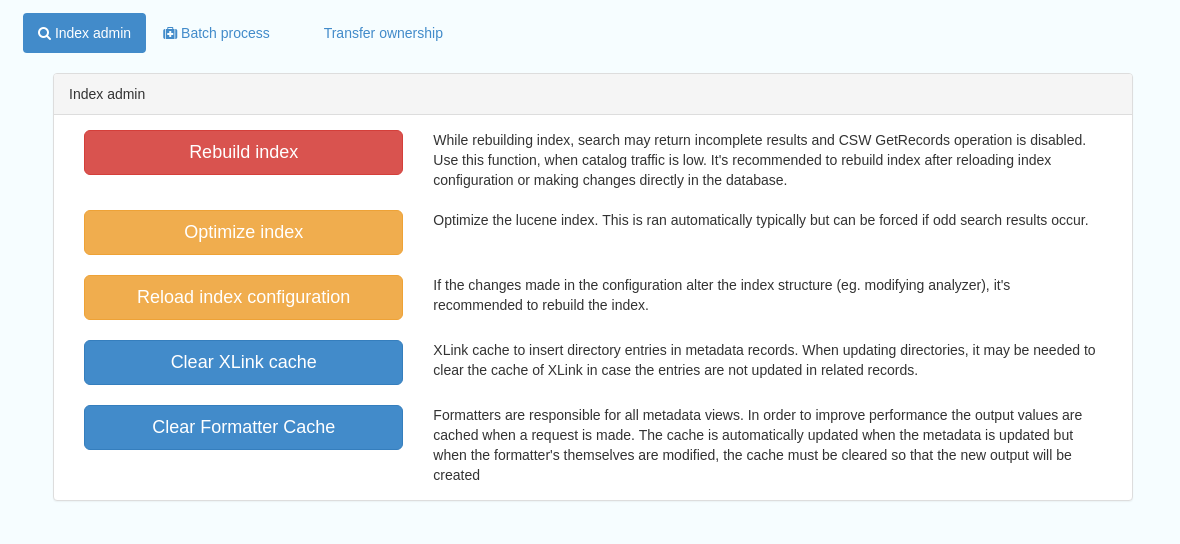
Figure 13.1.1: The index admin interface
Transfer ownership
This subsection allows you to change the owner (user) of a set of records. Choose the user from the dropdown list, noting that this list contains only users with profiles of editor and above.
The “Target group and editor” dropdown list will then show all users with editor profile and above, and additionally full administrators for the catalog. Select the appropriate editor and then click the  button.
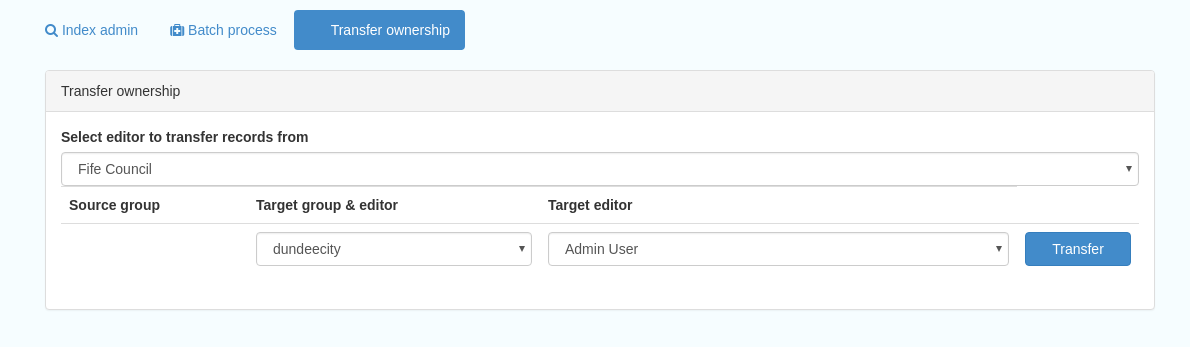
Figure 13.2.1: The transfer ownership interface, configured for transferring records currently owned by the Fife Council user to the Admin user.
Note that changing the ownership of a record applies only to users and does not affect group privileges. This tool is also available in the Search panel and the Editor board as one of the available actions for selected results.
Editing online documentation
The source for the online documentation is written in ReStructuredText (rst) syntax and stored in a public repository on GitHub at https://github.com/AstunTechnology/ssdidocs. Every time this source documentation is updated, it is regenerated into html by ReadTheDocs and the generated version is available at http://scottish-sdi-metadata-portal.readthedocs.io/.
There are two sections to the documentation at present, represented by two separate rst files:
User guidance https://github.com/AstunTechnology/ssdidocs/blob/master/docs/ssdi_guidance.rst
Admin guidance https://github.com/AstunTechnology/ssdidocs/blob/master/docs/ssdi_adminguidance.rst
Editing the documentation will require a GitHub account.
ReStructured Text Syntax
ReStructured Text documents should be written in a text editor rather than a word processing application
A guide to syntax can be found at http://docutils.sourceforge.net/docs/user/rst/quickref.html
An online editor and previewer can be found at http://rst.ninjs.org/
Edit on github
The documentation can be edited online by either clicking the “Edit on GitHub” link, or navigating to the URLs given above. Note that the procedure outlined here seems complicated but in most cases it’s a button-pressing exercise.
Click the edit icon for the document you wish to edit.
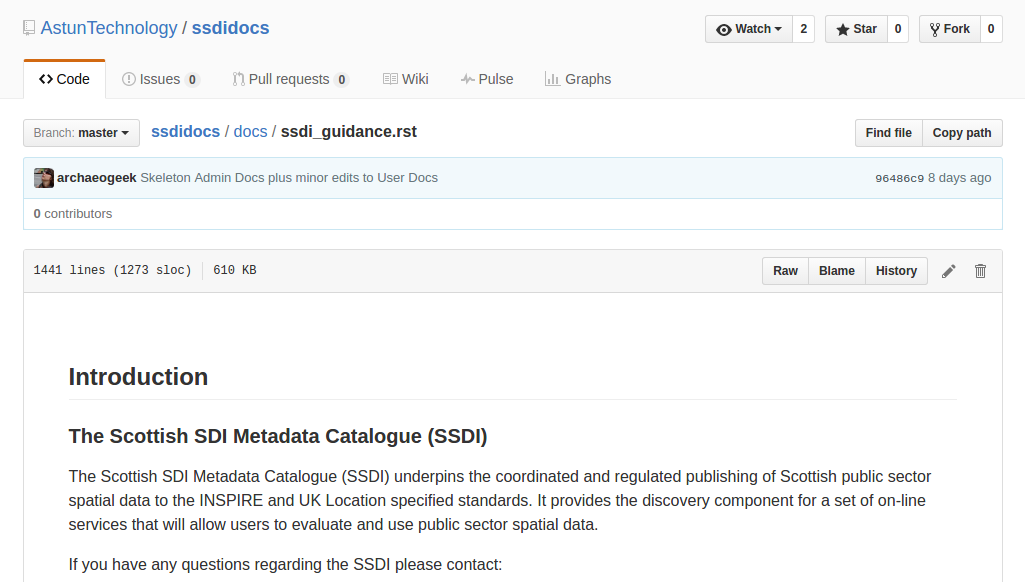
Figure 14.1.1.: Editing in GitHub
The editing interface has two tabs, one for editing and one for previewing changes. You can use shortcuts like ctrl-f to find text in the document that you wish to change. Check your changes using the preview tab, and then in the “Propose file change” section briefly outline your change.
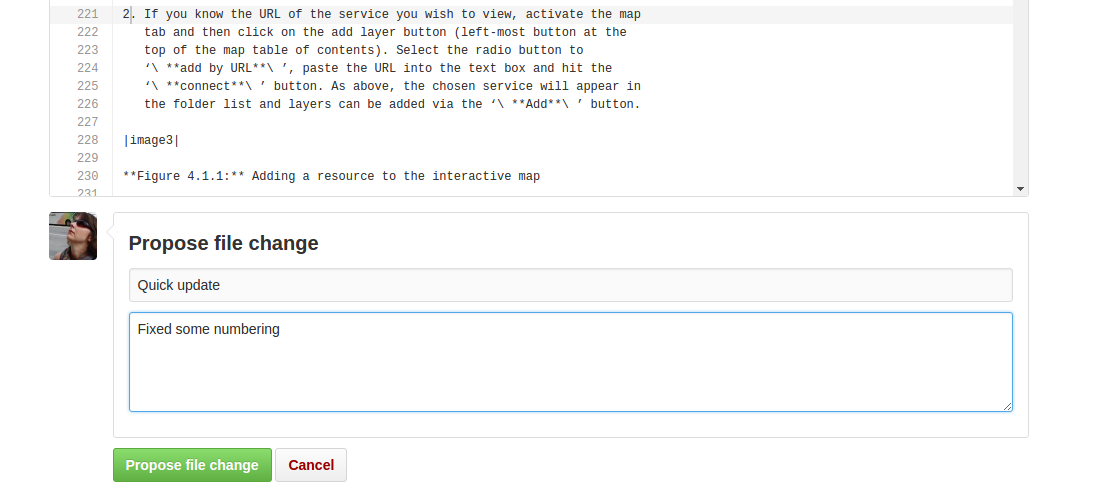
Figure 14.1.2: Detailing your changes
Click the green “Propose change” button and then in the following window, quickly review your changes and then click the green “Create pull request” button.
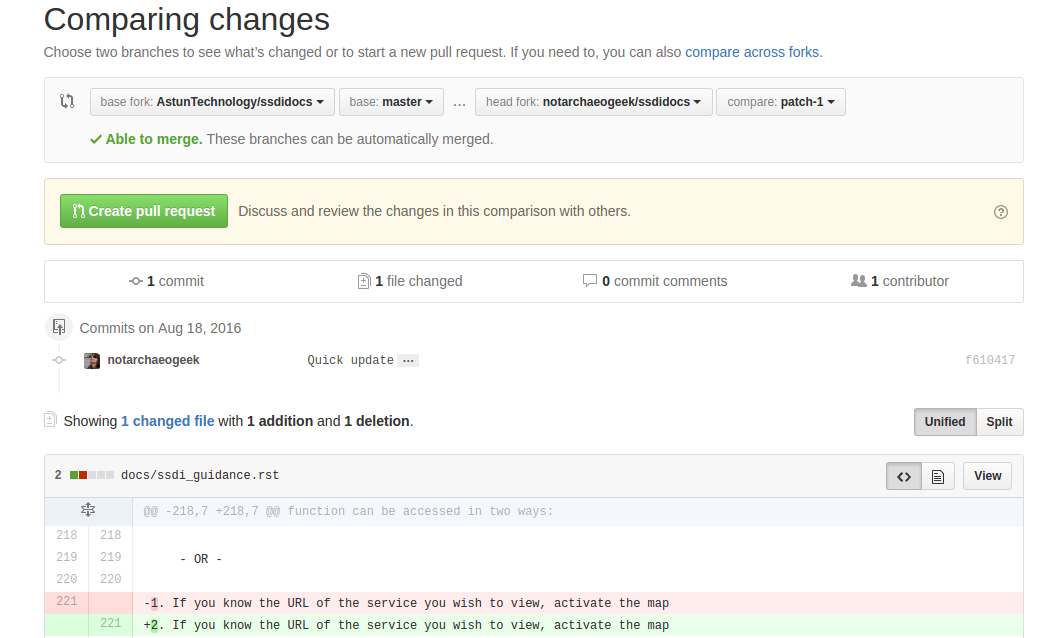
Figure 14.1.3: Reviewing the pull request
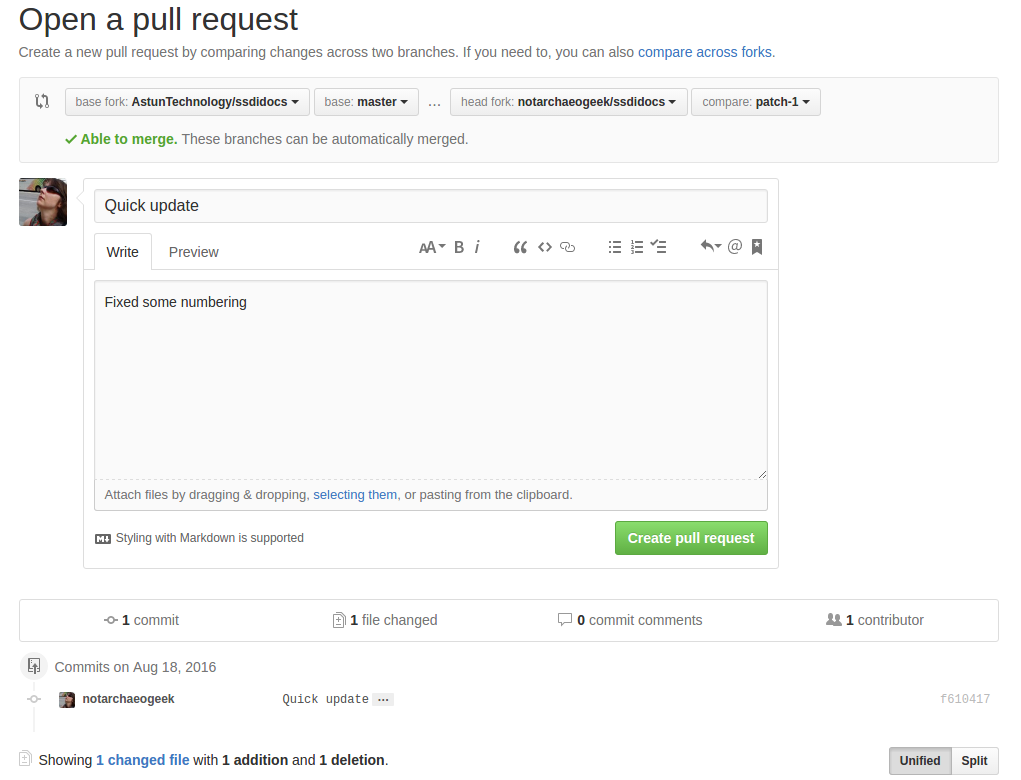
Figure 14.1.4: Creating the pull request
In the following window, if necessary expand on your explanation of the changes and then click the green “Create pull request” button.
The final window provides one further opportunity to make comments about your changes, but there is no requirement to do so. An email is sent to the owner of the repository, who will review the changes you have made and accept or reject them. If the change is accepted you will be notified by email but need take no further action- the new documentation will be automatically updated and pushed to ReadTheDocs. If the change is rejected for some reason then you will be notified of the reason why and the pull request will be closed without your changes being accepted.
Note that you will not be able to add new images using this method, you’ll need to edit locally (or provide Astun with the images).
Editing locally
Editing the files locally requires the installation of a Git client on your local computer. Details on installation and configuring git are beyond the scope of this document, but downloads and instructions for windows can be found at https://git-for-windows.github.io/.
You will need a GitHub account to edit files locally.
Advanced Troubleshooting
Changes to stylesheets and layout configuration occasionally require the GeoNetwork cache to be rebuilt. This may result in partially displayed or completely blank pages. If the “Clear Formatter Cache” tool in the Admin Console does not resolve the issue, or is not reachable, then running the following two services will resolve the problem. You will need to reload the problematic page once you have run these two services.
Reload Model: https://www.spatialdata.gov.scot/geonetwork/static/wroAPI/reloadModel
Reload Cache: https://www.spatialdata.gov.scot/geonetwork/static/wroAPI/reloadCache
Note that the services don’t return a result, just a blank page. Note also that the pages will take a long time to load after these services have been run, as the cache is being completely rebuilt.